Working with NICE DCV for many years our technical team at NI SP has compiled a number of Tips and Tricks related to NICE DCV administration and tuning. If you have any further questions just let us know.
Table of contents
- Location of NICE DCV Logfiles
- Changing the debug level in the DCV Client and the DCV Server
- How to enable the UDP based QUIC transport protocol in DCV
- Enabling QUIC Streams
- How to configure the X Server for Linux DCV Console Sessions
- DCV Console Sessions with Nvidia GPU and no monitor connected
- Connect to a specific DCV session
- Adapting the DCV Web Client default resolution
- Disable NICE DCV Authentication on Windows
- Enabling the Grip Bar in Full-Screen Mode
- Allow different users to connect to DCV on Windows
- Linux: nVidia driver not working anymore
- Adapt the DCV image quality for best user experience
- How to increase image quality forcing YUV444 or YUV420 lossless updates
- Force YUV444 colorspace for video content
- Force YUV colorspace for lossless updates
- Analyze GPU consumption with nVidia SMI and Process Explorer
- Optimize nVidia GPU performance
- GPU frame rate drops to 1 fps after some minutes
- Check supported display resolutions
- How to enable multi-monitor on nVidia GPUs
- How to disable the DCV client certificate check
- How adapt the default timeout of DCV sessions
- How to disable IPv6 for web sockets
- How to modify the Windows DCV Client connection history
- Dynamically set NICE DCV session permissions at Windows logon
- How to disable the Windows IDD driver in NICE DCV
- NICE DCV Product Codes and Features
Location of NICE DCV Logfiles
Typically Windows DCV Logfiles are here: C:\ProgramData\NICE\dcv\log\ and
Linux DCV Logfiles are here: /var/log/dcv/. The DCV logfiles e.g. the agent logfile and others will help troubleshooting DCV questions.
Changing the debug level in the DCV Client and the DCV Server
To create debug logfiles on the DCV client side:
- open a command prompt and go to the folder where the dcvviewer application is located (it is usually in C:\Program Files (x86)\NICE\DCV\Client\bin) and the start the DCV Client:
dcvviewer.exe --log-level=debug --log-file-name=log.txt- reproduce the issue
- send us the log.txt file that has been generated in that folder
On the server side on Linux you can add in the [log] section in /etc/dcv/dcv.conf:
[log]
log-level="debug"
This will enable debug logs after restart of the DCV server. After debugging please comment this entry again or configure the default “info”. The verbosity levels (in order of the amount of detail they provide) are: ‘error’,
‘warning’, ‘info’, and ‘debug’.
On Windows the registry entry is HKEY_USERS\S-1-5-18\Software\GSettings\com\nicesoftware\dcv\log\level where we can set the value to “debug”. In DCV on Windows the loglevel is immediately active in the DCV agent server.
To enable debug logs in the browser please connect adding “?logLevel=debug” to the URL – eg.: https://11.60.0.25:8443/?logLevel=debug
How to enable the UDP based QUIC transport protocol in DCV
To enable the high-FPS QUIC/UDP protocol offering by default 60 FPS e.g. on Windows DCV servers (starting with DCV version 2020.2) you can enable QUIC in the registry.
On the DCV server side you can use the Registry Editor to configure the key HKEY_USERS/S-1-5-18/Software/GSettings/com/nicesoftware/dcv/connectivity/enable-quic-frontend as 32-bit DWORD with the value 1:

Or using PowerShell:
New-ItemProperty -Path "Microsoft.PowerShell.Core\Registry::\HKEY_USERS\S-1-5-18\Software\GSettings\com\nicesoftware\dcv\connectivity" -Name enable-quic-frontend -PropertyType DWORD -Value 1 -Force
REM Enable QUIC Streams for best performance
New-ItemProperty -Path "Microsoft.PowerShell.Core\Registry::\HKEY_USERS\S-1-5-18\Software\GSettings\com\nicesoftware\dcv\connectivity" -Name enable-datagrams-display -PropertyType STRING -Value "always-off" -Force
On Linux DCV servers QUIC can be enabled in dcv.conf in the connectivity section:
[connectivity]
enable-quic-frontend=true
After starting the DCV client (beginning with version 2020.2, the web browser client does not support UDP) you click on “Connection Settings” and in the “Advanced” tab you can choose QUIC transport:
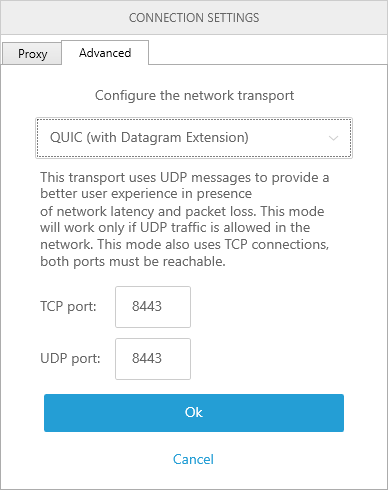
Please note to enable the UDP traffic (UDP 8443 and TCP 8443 by default) to pass through the firewall or cloud security group in case.
To verify QUIC is used you can navigate in the DCV client to Settings (upper left) -> Streaming Mode and the popup should show (DCV 2020.1):
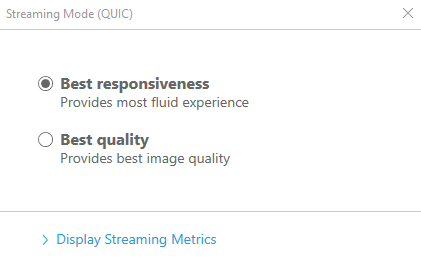
To test the difference of the DCV streaming modes you can switch easily between the TCP and QUIC/UDP mode in the settings of the client before connecting to the DCV session.
This NI SP demo video shows the difference in remote experience using TCP versus QUIC/UDP for higher latencies of ca. 100 msec: https://youtu.be/FDQumi0lPvA?t=282. Above ca. 50 – 70 msec latency we suggest to test how QUIC/UDP works for your use case.
For more background on QUIC from the NICE dev team head over to our news article How NICE DCV achieves 4K 60 fps high-quality interactive streaming with two videos from the DCV development team.
Enabling QUIC Streams
For the best performance we suggest to enable QUIC Streams instead of the default QUIC Datagrams (more info: Background on QUIC Streams and QUIC Datagrams) you can use the following approach:
Starting with DCV 2023.1 you can add the following configuration in the [connectivity] section of your DCV configuration file for Linux DCV Servers. Please restart dcvserver after the change has been made.
[connectivity]
enable-quic-frontend=true
enable-datagrams-display=always-off
And in case of Windows DCV Servers the PowerShell setting:
New-ItemProperty -Path "Microsoft.PowerShell.Core\Registry::\HKEY_USERS\S-1-5-18\Software\GSettings\com\nicesoftware\dcv\connectivity" -Name enable-quic-frontend -PropertyType DWORD -Value 1 -Force
New-ItemProperty -Path "Microsoft.PowerShell.Core\Registry::\HKEY_USERS\S-1-5-18\Software\GSettings\com\nicesoftware\dcv\connectivity" -Name enable-datagrams-display -PropertyType STRING -Value "always-off" -Force
You can also use QUIC Streams instead of QUIC Datagrams by starting the DCV client with the following option:
On Windows:dcvviewer.exe --enabled-quic-alpn-versions="Dcv20Basic"
On Linux / Macos:./dcvviewer --dqt-alpn-versions="Dcv20Basic"
How to configure the X Server for Linux DCV Console Sessions
DCV Console Sessions with Nvidia GPU and no monitor connected
In this section we describe how to configure the X server with Nvidia GPU to work without connected monitor.
- Download the binary EDID file of the monitor where the DCV Client is running – e.g. the local laptop – and copy it to the Linux server (see below on how to retrieve the EDID file)
- In the xorg.conf (e.g. created by the command
nvidia-xconfig --preserve-busid --enable-all-gpus --connected-monitor=DFP-0,DFP-1for 2 monitors, please adapt accordingly for 1 monitor) we configure the Device section as follows with our EDID file:# Section "Device"
# Option "ConnectedMonitor" "DFP-0"Option "ConnectedMonitor" "DFP-0, DFP-1"
# Option "CustomEDID" "DFP-0:/etc/X11/MONITOR_edid.bin"
Option "CustomEDID" "DFP-0:/etc/X11/MONITOR_edid.bin; DFP-1:/etc/X11/MONITOR_edid.bin"
# disable DPMS as it can reduce the FPS to 1
Option "HardDPMS" "false" - In the Screen section of the xorg.conf we add a metamode directive according to the resolution of the monitor screen (e.g. 2560 x 1440):
# Section "Screen"
# Option  "MetaModes" "2560_1440 +0+0"
# 2 screens next to each other
Option    "MetaModes" "DFP-0: 2560x1440_144 +0+0, DFP-1: 1920x1080_60 +2560+0"
# Option  "MetaModes" "DFP-0: 1920x1080_60, DFP-1: 1280x720_60"
# Option  "MetaModes" "DFP-0: resolution +position_x +position_y {ViewPortIn=resolution, ViewPortOut=resolution+position_x+position_y}, DFP-1: resolution +position_x +position_y"
As an example the xorg.conf might look like this xorg-no-monitor.conf with the above configuration including tablet support.
Using the nvidia-settings GUI can sometimes be easier for generating and testing metamodes dynamically before committing them to xorg.conf.
How to get the EDID file of a monitor
macOS:
Open the Terminal application.
Run the following command:
ioreg -lw0 | grep -i “IODisplayEDID” | sed -e ‘s/.*//’ > edid.bin
The command will output the EDID data in hexadecimal format.
Copy the hexadecimal data and save it to a file with a .bin extension (e.g., edid.bin).
Windows:
E.g. Download and install the “Monitor Asset Manager” tool from the Microsoft Store or from the Microsoft Download Center – or from EnTech: Monitor Asset Manager
Launch the “Monitor Asset Manager” tool.
Select the desired monitor from the list of connected displays.
Click on the “Export EDID” button to save the EDID data to a file.
Choose a location to save the EDID file and give it a name with a .bin extension (e.g., edid.bin).
Linux:
In a terminal run
xrandr –props
and find the line that starts with EDID followed by hex data which you can copy and save into the binary EDID file: edid.bin
– or –
Install the read-edid package if it’s not already installed. On Debian-based systems, you can use the following command:
sudo apt-get install read-edid # or
# sudo dnf install read-edid # Fedora, …
Run the following command to get the EDID data and save to the binary EDID file:
sudo get-edid > edid.bin
This command will output the parsed EDID information.
sudo get-edid | parse-edid
Connect to a specific DCV session
When running multiple DCV sessions on one server you can specify in the DCV client to which session you would like to connect to by adding “#session_name” – e.g. #session3 in the example below:
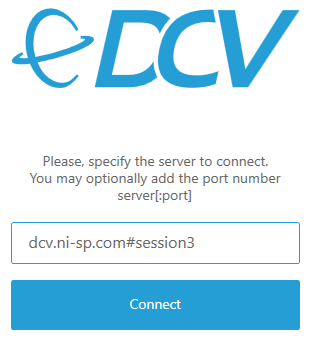
This also is possible in the DCV web client by specifying the session name in the URL like e.g. https://dcv.ni-sp.com#session3.
Adapting the DCV Web Client default resolution
The default maximum remote desktop resolution for the DCV WebClient is set to (1920, 1080). This can be adapted by setting the parameter “web-client-max-head-resolution” in the “display” section of the DCV server configuration. The browser must of course be able to support the higher resolution with appropriate performance.
On a Windows DCV server you can set the registry key HKEY_USERS\S-1-5-18\Software\GSettings\com\nicesoftware\dcv\display\web-client-max-head-resolution to the desired maximum resolution.
Disable NICE DCV Authentication on Windows
To disable the NICE DCV authentication on Windows you can follow these steps:
- Open the Windows Registry Editor.
- Navigate to the
HKEY_USERS/S-1-5-18/Software/GSettings/com/nicesoftware/dcv/security/and select theauthenticationparameter. If there is no authentication parameter in the registry key, create one
a. In the left-hand pane, open the context (right-click) menu for the authentication key and choose New, string value.
b. For Name, type authentication and press Enter. - Open the authentication parameter. For Value data, enter either system or none.
- Choose OK and close the Windows Registry Editor.
- Restart the DCV Server
Enabling the Grip Bar in Full-Screen Mode
When you have enabled full-screen mode in the NICE DCV client you can move to the upper screen area to trigger showing the menu bar. In case this automatic behaviour does not fit your use case you can click the pin to the right of the dotted bar (“…”) and the grip bar is stuck. You can then also move it to the place where it works best for you. Screenshots are below with pin open in the first screenshot:

Locked grip bar after clicking the pin and moved to another location:

Allow different users to connect to DCV on Windows
DCV on Windows by default starts one session, this session has an “owner”.
The default owner proposed at installation time is Administrator. You can change it during installation time or afterwards in the registry.
By default only the owner can connect to that session. If you want multiple users to be able to connect to the session, you have to change the DCV session permissions. From the DCV admin guide:
“The default permissions file is used for all sessions if you do not specify a custom permissions file when creating a session. The default permissions file grants only the session owner full access to all features.“
“You can customize the default permissions file to include custom authorizations. The default permissions file is located at C:\Program Files\NICE\DCV\Server\conf\default.perm on Windows NICE DCV servers.”
You can configure a group (e.g. osgroup:YOUR_GROUP) or allow all users (%any%) to connect in default.perm:
[groups]
mygroup1=dom\user1, user2

[aliases]
; create permission alias
file-management=file-upload, file-download, clipboard-management

[permissions]
; Example to allow all users to connect
%any% allow builtin

; Example to allow users from osgroup YOUR_GROUP to connect
osgroup:YOUR_GROUP allow builtin

; allow the predefined mygroup to connect
group:mygroup1 allow builtin
The following features can be configured in the permissions file which allows for fine-granular permission control e.g. related to file transfer, cut&paste, USB devices, … :
builtin — All features.
display — Receive visual data from the NICE DCV server.
clipboard-copy — Copy data from the NICE DCV server to the client clipboard.
clipboard-paste — Paste data from the client clipboard to the NICE DCV server.
file-download — Download files from the session storage.
file-upload — Upload files to the session storage.
mouse — Input from the client pointer to the NICE DCV server.
keyboard — Input from the client keyboard to the NICE DCV server.
keyboard-sas — Use the secure attention sequence (CTRL+Alt+Del). Requires the keyboard
feature. Supported on version DCV 2017.3 and later.
touch — Use native touch events. Supported on version DCV 2017.3 and later. Not supported on Linux NICE DCV servers.
stylus — Input from specialized USB devices, such as 3D pointing devices or graphic tablets.
usb — Read the smart card from the client.
pointer — View NICE DCV server mouse position events and pointer shapes. Supported on version DCV 2017.3 and later.
audio-out — Play back NICE DCV server audio on the client.
audio-in — Insert audio from the client to the NICE DCV server.
printer — Print PDFs or XPS files from the NICE DCV server to the client.
smartcard — Read the smart card from the client.
Linux: nVidia driver not working anymore
In case an update of the kernel is performed e.g. via the yum update command, then the nVidia driver needs to be reinstalled. The related commands typically look similar like this (please remember to use dcvgldiag to check the DCV installation):
# reinstall the nVidia driver
sudo sh NVIDIA-Linux-x86_64-430.26.run
sudo nvidia-xconfig --preserve-busid --enable-all-gpus
# Add line ‘Option "UseDisplayDevice" "None" ’ into Screen section
sudo vim /etc/X11/xorg.conf
# ensure that X server is running; you might get logged out by these commands
sudo systemctl isolate multi-user.target
sudo systemctl isolate graphical.target
# enable DCV for 3D
sudo dcvgladmin enable
# verify the installation with dcvgldiag
dcvgldiag ### typical out like below
dcvgldiag is a very convenient tool to check the DCV installation on Linux which is part of the NICE DCV download:
root@host# dcvgldiag
NICE DCV - Diagnostic Script
 Host:             ip-172-31-19-22.eu-west-1.compute.internal
 Architecture:     x86_64
 Operating System: Red Hat Enterprise Linux Server release 7.7 (Maipo)
 Kernel Version:   3.10.0-1062.1.2.el7.x86_64
 Nvidia GPU:       GRID K520
 Nvidia Driver:    430.26
 Runlevel:         5
 X configuration file: /etc/X11/xorg.conf
 DCV GL is enabled for 64 bit applications.
 Running tests: ………………. DONE
 No problem found.
 A detailed report about the tests is available in '/root/dcvgldiag-qc1nmo'
And check if the nVidia driver is working fine again:
# check if the driver is working properly
root@host# nvidia-smi
Mon Jun 29 12:46:29 2020
+-----------------------------------------------------------------------------+
| NVIDIA-SMI 430.26       Driver Version: 430.26       CUDA Version: 10.2     |
|-------------------------------+----------------------+----------------------+
| GPU  Name        Persistence-M| Bus-Id        Disp.A | Volatile Uncorr. ECC |
| Fan  Temp  Perf  Pwr:Usage/Cap|         Memory-Usage | GPU-Util  Compute M. |
|===============================+======================+======================|
|   0  GRID K520           Off  | 00000000:00:03.0 Off |                  N/A |
| N/A   46C    P0    44W / 125W |    357MiB /  4037MiB |      0%      Default |
+-------------------------------+----------------------+----------------------+

+-----------------------------------------------------------------------------+
| Processes:                                                       GPU Memory |
|  GPU       PID   Type   Process name                             Usage      |
|=============================================================================|
|    0      2500      G   /usr/bin/X                                    62MiB |
|    0      2778      G   /usr/bin/gnome-shell                           4MiB |
|    0      3452      C   /usr/libexec/dcv/dcvagent                     60MiB |
|    0      4004      G   /usr/bin/gnome-shell                          59MiB |
|    0      7712      G   ...ownloads/lsprepost4.6_centos7/lsprepost   162MiB |
+-----------------------------------------------------------------------------+
Adapt the DCV image quality for best user experience
Please note: most of the settings below apply to DCV TCP based connections. DCV QUIC/UDP offers great interactivity so please consider trying QUIC/UDP for your use cases as well: Configuration of QUIC/UDP for DCV Remote Desktops.
For fine-grained control, you can tune the 0-100 quality setting on the server side by modifying the /etc/dcv/dcv.conf file and adding a line to the display section:
[display]
quality=(70,90)
The format is (minimum_quality,maximum_quality). So in this case it would lower the maximum H264 quality from it’s default value of 80 to 70. You can also raise the lower boundary from 30 to a higher value which will result in a higher bandwidth consumption while providing better image quality in the H264 stream. This setting and the ones highlighted below typically work on TCP based connections.
On Windows it would be the respective parameter in HKEY_USERS\S-1-5-18\Software\GSettings\com\nicesoftware\dcv\display\quality were we can create a string entry with “(60,90)” in case we want to always have a higher quality in the H264 stream with a higher bandwidth consumption.
When a larger portion of the screen content changes DCV will use a H264 stream to display the changing content. When the image is steady a pixel-perfect quality update will be send with the exact copy of the server side image on the GPU. To disable the quality update we can set HKEY_USERS\S-1-5-18\Software\GSettings\com\nicesoftware\dcv\display\enable-qu to 0 on Windows (false on Linux).
Further optimization in case you are working in a high bandwidth environment and want to increase image quality testing effects in the following order on the DCV server (you need to reconnect to the session or restart the DCV server to pick up the settings):
display/quality
Increase the H264 stream quality by settingdisplay/qualityto e.g. (60, 80) or (80, 90). This will lead to an increase in bandwidth consumption so you can try (90,95) as well which will result in the highest quality and bandwidth consumption. Setting 100 will enforce lossless and significantly higher bandwidth. Or you can lower the quality boundaries in a low bandwidth environment. In the case of QUIC/UDP the protocol uses the available bandwidth and sets bitrate to quality fitting related to bandwidth. The TCP protocol estimates quality then sets the bandwidth (opposite of QUIC)
Windows:New-ItemProperty -Path "Microsoft.PowerShell.Core\Registry::\HKEY_USERS\S-1-5-18\Software\GSettings\com\nicesoftware\dcv\display" -Name quality -PropertyType STRING -Value "(80,90)" -Forcedisplay/enable-qu(enable quality update)
Enabled by default (true). Quality updates to be send after the screen becomes steady. Sends pixel-perfect copy of the remote screen. Disabling can be useful for certain workloads in case lossless is not needed. An example of when useful is e.g. remote gaming (screen is refreshing too fast for lossless to happen anyway).
Windows:New-ItemProperty -Path "Microsoft.PowerShell.Core\Registry::\HKEY_USERS\S-1-5-18\Software\GSettings\com\nicesoftware\dcv\display" -Name enable-qu -PropertyType DWORD -Value 0 -Forcedisplay/qu-bandwidth(quality update bandwidth)
Configure to use more bandwidth for the quality update by settingdisplay/qu-bandwidthto 10 (or 20). This will allow lossless to happen faster, the default being 2. Only active when quality updates are enableddisplay/frame-queue-weights
Tweak queue weights for low latency and high bandwidth by settingdisplay/frame-queue-weightsto (8,5,1) (default: (5,3,1)). This is related to increase the number of active frames (DCV will send more frames before waiting for an ACK from the client). This applies to the TCP protocol. Related to this isdisplay/frames-in-transit
Control the min-max frames in transit, default is (2, 4). E.g. setdisplay/frames-in-transitto (2, 8). This applies to the TCP protocoldisplay/target-fps
Adapt the frame limiter by settingdisplay/target-fpsto 60 or even disable it by setting it to 0display/use-grabber-dirty-region
Setdisplay/use-grabber-dirty-regionto false (Specifies whether to use dirty screen regions. If enabled, the grabber tries to compute new frames out of the changed regions from the screen which is helpful in case of some desktop manager like XFCE)
All these settings can be applied for DCV on Linux as well in dcv.conf in the [display] section similar to the example above.
More settings related to the DCV display configuration and other paramters can be found here: https://docs.aws.amazon.com/dcv/latest/adminguide/config-param-ref.html#display
Please note the Reload context column in each table indicates when the parameter is reloaded. Possible contexts include:
server—The parameter is loaded once when the server is started. If the parameter value is updated, the new value is loaded when the server is restarted.session—The parameter is loaded when the session is created. If the parameter value is updated, the new value is loaded for subsequent sessions.connection—The parameter is loaded when a new client connection is established. If the parameter value is updated, the new value is used for subsequent client connections.custom—The conditions under which the parameter loads is unique to this parameter. See the parameter description for more information.
How to increase image quality forcing YUV444 or YUV420 lossless updates
In some cases high fidelity of images is needed like in movie editing where chroma artifacts introduced by the H264 stream can be an issue. In this case the colorspace can be changed for better image quality while increasing the network usage.
Force YUV444 colorspace for video content
Tradeoff: improve the overall quality, but increase the network usage.
To enable this on the Windows client there are two options:
- Launch the client from the command line and set the option –enable-yuv444-decoding=true, for example with the command:C:\WINDOWS\system32>”C:\Program Files (x86)\NICE\DCV\Client\bin\dcvviewer.exe” –enable-yuv444-decoding=true
- Set the EnableYUV444Decoding=true setting in the connection file [options] section. For example, add this configuration to the connection file:[options] EnableYUV444Decoding=true
To enable this on the Linux client and macOS client, you need to set the dconf registry:
- Launch the dconf-editor and enable the option enable-yuv444-decoding at path com -> nicesoftware -> DcvViewer -> display.
It is not possible to set this option on the web client.
Force YUV colorspace for lossless updates
Tradeoff: reduce flickering, but lossless updates will not have the exact RGB values of the server source.
To enable this on the Windows client:
- Launch the client from the command line and set the option –enable-lossless-yuv-decoding=true, for example with the command:C:\WINDOWS\system32>”C:\Program Files (x86)\NICE\DCV\Client\bin\dcvviewer.exe” –enable-lossless-yuv-decoding=true
- Set the EnableLosslessYUVDecoding=true setting in the connection file [options] section. For example, add this configuration to the connection file:[options] EnableLosslessYUVDecoding=true
To enable this on the Linux client and macOS client, you need to set the dconf registry:
- Launch the dconf-editor and set the option lossless-colorspace to value yuv_rec601 at path com -> nicesoftware -> DcvViewer -> display.
It is not possible to set this option on the web client.
Analyze GPU consumption with nVidia SMI and Process Explorer
You can find out how much GPU memory your applications are using with the nVidia tool nvidia-smi (/usr/bin/nvidia-smi) on Linux or C:\'Program Files'\'NVIDIA Corporation'\NVSMI\nvidia-smi.exe on Windows. With the option -a nvidia-smi will show full GPU details.

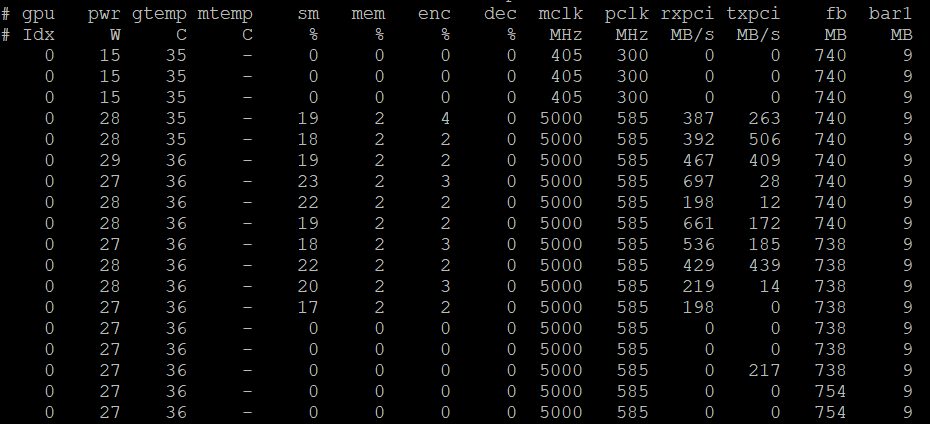
Monitoring the GPU status with nvidia-smi is available with the dmon option, e.g. nvidia-smi dmon -s puctm , which will allow to log values with respective options including utilization and PCIe bus throughput:
- p – Power Usage and Temperature
- u – Utilization
- c – Proc and Mem Clocks
- v – Power and Thermal Violations
- m – FB and Bar1 Memory
- e – ECC Errors and PCIe Replay errors
- t – PCIe Rx and Tx Throughput
and produce output similar to this which can be logged into a file as well:
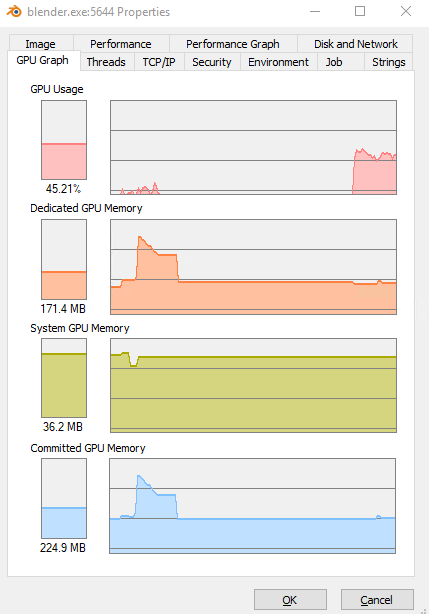
Another very helpful tool to understand GPU usage on Windows is Process Explorer (Microsoft Process Explorer). Here a sample output with GPU consumption by Blender:
Optimize nVidia GPU performance
For optimal performance of nVidia GPUs the clock settings are important. You can set specific clock rates depending on the application or configure Auto Boost to adapt the clock rates to the best values depending on application needs and the thermal situation.
You can query the present clock settings with nvidia-smi -q -i 0 -d CLOCK which will produce an output similar to this:
> nvidia-smi -q -i 0 -d CLOCK
==============NVSMI LOG==============

Driver Version                            : 450.89
CUDA Version                              : 11.0
Attached GPUs                             : 1
GPU 00000000:00:1E.0
    Clocks
        Graphics                          : 405 MHz
        SM                                : 405 MHz
        Memory                            : 324 MHz
        Video                             : 405 MHz
    Applications Clocks
        Graphics                          : 1177 MHz
        Memory                            : 2505 MHz
    Default Applications Clocks
        Graphics                          : 557 MHz
        Memory                            : 2505 MHz
    Max Clocks
        Graphics                          : 1177 MHz
        SM                                : 1177 MHz
        Memory                            : 2505 MHz
        Video                             : 1083 MHz
    Max Customer Boost Clocks
        Graphics                          : N/A
    SM Clock Samples
        Duration                          : 386.49 sec
        Number of Samples                 : 29
        Max                               : 1177 MHz
        Min                               : 405 MHz
        Avg                               : 548 MHz
    Memory Clock Samples
        Duration                          : 386.49 sec
        Number of Samples                 : 29
        Max                               : 2505 MHz
        Min                               : 324 MHz
        Avg                               : 2157 MHz
    Clock Policy
        Auto Boost                        : Off
        Auto Boost Default                : Off
At the end of the output we can see that Auto Boost is set to “off” or “N/A” depending on the GPU. We can change this to “on” with the following command: sudo nvidia-smi --auto-boost-default=ENABLED -i 0. In case we want to set clocks to specific values we can do this with the following commands – first we make sure persistence mode is enabled and then we set Auto Boost or memory and SM clocks:
> sudo nvidia-smi -pm ENABLED -i 0
Enabled persistence mode for GPU 00000000:00:1E.0.
> # sudo nvidia-persistenced   # alternatively
> sudo nvidia-smi --auto-boost-default=ENABLED -i 0
All done.
# alternatively check for available clocks and set respectively
> nvidia-smi  -q -i 0 -d SUPPORTED_CLOCKS
........ Output ......
> sudo nvidia-smi --applications-clocks=2505,1177   # M60, depending on available clocks
Applications clocks set to "(MEM 2505, SM 1177)" for GPU 00000000:00:1E.0
> sudo nvidia-smi -ac 5001,1590                     # T4
Applications clocks set to "(MEM 5001, SM 1590)" for GPU 00000000:00:1E.0
GPU frame rate drops to 1 fps after some minutes
On Linux instances with NVIDIA GPUs the Display Power Management (DPMS) can reduce the performance of the GPU and limit the GPU frame rate to 1 fps. The issue can be reproduced on physical hosts, with driver 415.xx and later.
The issue is not related to DCV. It can be reproduced without a running DCV server by e.g. running glxgears for some minutes in a SSH connection:
DISPLAY=:0 glxgears
...
300 frames in 5.0 seconds = 59.972 FPS
300 frames in 5.0 seconds = 59.972 FPS
300 frames in 5.0 seconds = 59.972 FPS
101 frames in 5.7 seconds = 17.767 FPS
5 frames in 5.0 seconds =  1.000 FPS
5 frames in 5.0 seconds =  1.000 FPS
...
The issue can be solved by disabling the HardDPMS option of NVIDIA driver 415 and later.
To disable the HardDPMS option add this row to the Device section of the /etc/X11/xorg.conf file:
Section "Device"
    ...
    Option         "HardDPMS" "false"
    ...
EndSection
Below are 3 bash script lines to add this option in /etc/X11/xorg.conf:
# Add in /etc/X11/xorg.conf: Option "HardDPMS" "false"
sudo cp /etc/X11/xorg.conf /etc/X11/xorg.conf.BK
sudo sed '/^Section "Device"/a \ \ \ \ Option         "HardDPMS" "false"'  /etc/X11/xorg.conf > /tmp/xorg.conf
sudo mv /tmp/xorg.conf /etc/X11/xorg.conf
or in an Extensions section:
Section "Extensions"
    Option      "DPMS" "Disable"
EndSection
Check supported display resolutions
On Linux, make sure that the X server is running and use the command xrandr to get the minimum and maximum resolution supported by the driver:
$ DISPLAY=:0 xrandr
Screen 0: minimum 8 x 8, current 2560 x 1600, maximum 2560 x 1600
[...]
On Windows, you can use the following command from a PowerShell terminal to get the list of supported resolutions:
PS C:\> foreach ($video in Get-WmiObject -Class CIM_VideoControllerResolution) { Write-Host $video }
....
\\EC2AMAZ-PDQBG1E\root\cimv2:CIM_VideoControllerResolution.SettingID="1920 x 1080 x 4294967296 colors @ 59 Hertz“
\\EC2AMAZ-PDQBG1E\root\cimv2:CIM_VideoControllerResolution.SettingID="1920 x 1200 x 4294967296 colors @ 59 Hertz“
\\EC2AMAZ-PDQBG1E\root\cimv2:CIM_VideoControllerResolution.SettingID="1920 x 1440 x 4294967296 colors @ 59 Hertz“
\\EC2AMAZ-PDQBG1E\root\cimv2:CIM_VideoControllerResolution.SettingID="2048 x 1536 x 4294967296 colors @ 59 Hertz“
\\EC2AMAZ-PDQBG1E\root\cimv2:CIM_VideoControllerResolution.SettingID="2560 x 1440 x 4294967296 colors @ 59 Hertz“
\\EC2AMAZ-PDQBG1E\root\cimv2:CIM_VideoControllerResolution.SettingID="2560 x 1600 x 4294967296 colors @ 59 Hertz“
\\EC2AMAZ-PDQBG1E\root\cimv2:CIM_VideoControllerResolution.SettingID="3840 x 2160 x 4294967296 colors @ 60 Hertz“
\\EC2AMAZ-PDQBG1E\root\cimv2:CIM_VideoControllerResolution.SettingID="4096 x 2160 x 4294967296 colors @ 60 Hertz“
How to enable multi-monitor on nVidia GPUs
In case you are working on Linux with a nVidia GPU like the T4 (e.g. in G4 instances) which does not automatically enable multi-monitor support on the client you can use the following command to configure xorg.conf to enable multi-monitor:
nvidia-xconfig --preserve-busid --enable-all-gpus --connected-monitor=DFP-0,DFP-1,DFP-2,DFP-3
Partially inspired by NICE support articles. If you have any questions or comments please let us know.
How to disable the DCV client certificate check
NICE DCV comes with a self signed certificate. In some cases the administrator wants to disable the certificate checking of the DCV client e.g. when working in a trusted environment. You can disable the certificate checking by adding
[connect]
certificatevalidationpolicy=accept-untrusted
to your .dcv connection file template, or specify
--certificate-validation-policy accept-untrusted
on the command line of the client.
How adapt the default timeout of DCV sessions
In case of Windows you can adapt the default timeout of 60 min in the registry at DWORD key “connectivity\idle-timeout”. Using PowerShell to set the idle-timeout to e.g. 0 to never timeout you can issue the following command:
New-ItemProperty -Path "Microsoft.PowerShell.Core\Registry::\HKEY_USERS\S-1-5-18\Software\GSettings\com\nicesoftware\dcv\connectivity" -Name idle-timeout -PropertyType DWORD -Value 0 -Force
In case of Linux you can adapt in dcv.conf the following parameter in the “connectivity” section:
# Property "idle-timeout" specifies a timeout in minutes after which
# a client that does not send keyboard or mouse events is considered idle
# and hence disconnected.
# By default it is set to 60 (1 hour). Set to 0 to never disconnect
# idle clients.
# idle-timeout=120
How to disable IPv6 for web sockets
In case you encounter such a message in the DCV server.log:
Failed to create web sockets frontend service Could not listen on address ::, port 8443:unable to create socket: Adress family not supported by protocol
It seems IPv6 is disabled on the server machine. To mitigate this you can configure web sockets to listen on IPv4 only in /etc/dcv.conf:
# Configure the `web-listen-endpoints` parameter in the `connectivity` section[2] of dcv.conf.
[connectivity]
web-listen-endpoints = ['0.0.0.0']
# If you are also using the QUIC frontend (i.e. `enable-quic-frontend` is set to `true` or `1`) then you need to do the same with:
quic-listen-endpoints = ['0.0.0.0']
How to modify the Windows DCV Client connection history
The history of connections in the DCV client is stored in the Windows registry. In case you want to clean or adapt the history you can modify this registry key: Computer\HKEY_CURRENT_USER\SOFTWARE\Nice\DCV\Application\ShortcutHistory. To clean the history you can use the following Powershell command:
Set-ItemProperty -Path "Microsoft.PowerShell.Core\Registry::\HKEY_CURRENT_USER\SOFTWARE\Nice\DCV\Application" -Name ShortcutHistory -Value ""
Dynamically set NICE DCV session permissions at Windows logon
Andrew from the DCV team has created a great guide how to set NICE DCV permissions at Windows login which applies to on-prem use cases similar to AWS based use cases of NICE DCV.
How to disable the Windows IDD driver in NICE DCV
The DCV version 2023.1 introduced the Indirect Display Driver (IDD) for Windows hosts to optimize the graphics pipeline and significantly reduces overall CPU usage. The IDD also supports blanking the connected physical display. In case that is not of interest you can disable the IDD driver by following these steps:
You can select to not install the IDD driver when you install the DCV server or you can set these registry keys (and restart the dcv server service)
Key: HKEY_USERS\S-1-5-18\Software\GSettings\com\nicesoftware\dcv\display

Value Name: layout-managers
Value Type: String (REG_SZ)
Value Data: ['nvapi', 'amd', 'dod', 'winapi']

Value Name: framebuffer-readers
Value Type: String (REG_SZ)
Value Data: ['desktopduplication', 'gdi']
And here the respective Powershell commands to disable the IDD driver:
New-ItemProperty -Path "Microsoft.PowerShell.Core\Registry::\HKEY_USERS\S-1-5-18\Software\GSettings\com\nicesoftware\dcv\display" -Name layout-managers -PropertyType STRING -Value "['nvapi', 'amd', 'dod', 'winapi']"
New-ItemProperty -Path "Microsoft.PowerShell.Core\Registry::\HKEY_USERS\S-1-5-18\Software\GSettings\com\nicesoftware\dcv\display" -Name framebuffer-readers -PropertyType STRING -Value "['desktopduplication', 'gdi']"
To verify you can inspect the agent.log and should see log entries similar to:
...
INFO  display - Skipping display layout manager extension displaylayoutmanageridd, as it is not enabled
...
INFO  display - Skipping reader fbreaderidd, as it is not enabled
NICE DCV Product Codes and Features
Here you can find an overview of NICE DCV Product Codes and Features.
Any suggestions or questions reach out to us!


