Table of contents
Automatic SLURM Build Script for RH/CentOS/… 7, 8 and 9 as well as Ubuntu 18, 20, 22 and 24 including Accounting
Building SLURM and installing is a partially manual process. We have compiled a script which automatically builds and installs SLURM on Redhat/CentOS/Rocky/AlmaLinux/… 7.x, 8.x and 9.x as well as Ubuntu 18, 20, 22 and 24 including optional Accounting.
You can execute the script at once or step by step to see what happens in case of interest. We recommend to execute the script as standard user being able to sudo to root.
You will be asked if you want to install the optional accounting support as well which will install MariaDB and configure SLURM accounting.
The automatic SLURM built and installation script for RH/CentOS/AlmaLinux/Rocky and Ubuntu derivatives can be downloaded here:
- https://github.com/NISP-GmbH/SLURM (latest version is on our github): SLURM_install.sh
You can simply run the following steps on your SLURM master:
#
# Automatic SLURM built and installation script for EL7, EL8 and EL9, Ubuntu and derivatives
#
# sudo yum install wget -y
# sudo apt install wget -y
wget --no-check-certificate https://raw.githubusercontent.com/NISP-GmbH/SLURM/main/slurm_install.sh
# or
# sudo bash -c "$(wget --no-check-certificate -qO- https://raw.githubusercontent.com/NISP-GmbH/SLURM/main/slurm_install.sh)"
# old script wget --no-check-certificate https://www.ni-sp.com/wp-content/uploads/2019/10/SLURM_installation.sh
# set the desired version in case
export VER=20.11.9  #latest 20.11. VER=20.11.8
# export VER=21.08.5
# export VER=22.05.02
bash slurm_install.sh --without-interaction=true --slurm-accounting-support=false
# wait a couple of minutes
# and test your SLURM installation yourself
sinfo
# see above for more SLURM commands and their output
You can also follow our guide on installing SLURM on Ubuntu (in WSL). Please see below for a container based setup of a SLURM cluster as well.
You can download pre-compiled RPMs for EL7 and EL8 here (you can basically start the script above at “cd ~/rpmbuild/RPMS/x86_64/” after extracting the tarball and setting up mariadb and munge):
- SLURM Version 20.02.3
- SLURM Version 20.11.0
- SLURM Version 21.08.6
In case you are interested in HPC in the Cloud head over to our overview article HPC in the Cloud – Pros and Cons.
Build RPMs only for RH/CentOS
In case you want to build only the RPMs here is the script for EL7:
sudo yum install epel-release -y
sudo yum install python3 gcc openssl openssl-devel pam-devel numactl \
     numactl-devel hwloc lua readline-devel ncurses-devel man2html \
     libibmad libibumad rpm-build  perl-ExtUtils-MakeMaker.noarch \
     rrdtool-devel lua-devel hwloc-devel munge munge-libs munge-devel \
     mariadb-server mariadb-devel -y
mkdir slurm-tmp
cd slurm-tmp
export VER=20.11.8    # latest 20.11
export VER=21.08.6
export VER=22.05.9
# export VER=23.02.2

wget https://download.schedmd.com/slurm/slurm-$VER.tar.bz2
rpmbuild -ta slurm-$VER.tar.bz2
echo Your RPMs are at $HOME/rpmbuild/RPMS/x86_64:
ls -al $HOME/rpmbuild/RPMS/x86_64
And here the automatic RPM builder for EL8:
sudo yum install epel-release -y
sudo yum install dnf-plugins-core
sudo yum config-manager --set-enabled powertools
# in case of repo access issues
# sudo sed -i 's/mirrorlist/#mirrorlist/g' /etc/yum.repos.d/CentOS-*
# sudo sed -i 's|#baseurl=http://mirror.centos.org|baseurl=http://vault.centos.org|g' /etc/yum.repos.d/CentOS-*
sudo yum install --enablerepo=powertools python3 gcc openssl \
     openssl-devel pam-devel numactl wget make numactl-devel \
     hwloc lua readline-devel ncurses-devel man2html \
     libibmad libibumad rpm-build  perl-ExtUtils-MakeMaker.noarch \
     rrdtool-devel lua-devel hwloc-devel munge munge-libs munge-devel \
     mariadb-server mariadb-devel rpm-build -y
mkdir slurm-tmp
cd slurm-tmp
export VER=20.11.8    # latest 20.11
export VER=21.08.6
export VER=22.05.9
# export VER=23.02.2
wget https://download.schedmd.com/slurm/slurm-$VER.tar.bz2
rpmbuild -ta slurm-$VER.tar.bz2
ls -al $HOME/rpmbuild/RPMS/x86_64
echo Your RPMs are at $HOME/rpmbuild/RPMS/x86_64
SLURM Cluster in Docker Containers
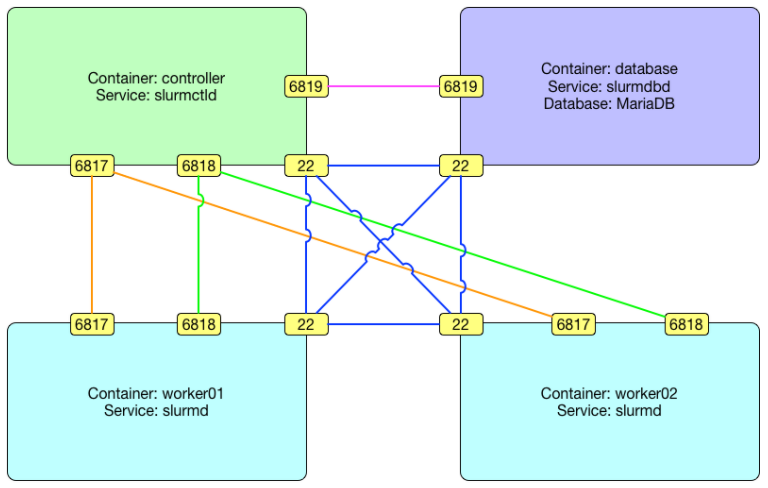
SciDAS has created a easy to use container-based SLURM setup to jump-start a small SLURM cluster. The automatic container build creates 2 SLURM compute workers with OpenMPI integration as well as a controller and a database container as per this graph from the github page:
Here is an overview how the straightforward installation on Ubuntu looks like with input from the github page:
> git clone https://github.com/SciDAS/slurm-in-docker
Cloning into 'slurm-in-docker'...
remote: Enumerating objects: 549, done.
remote: Total 549 (delta 0), reused 0 (delta 0), pack-reused 549
Receiving objects: 100% (549/549), 144.72 KiB | 682.00 KiB/s, done.
Resolving deltas: 100% (310/310), done.
# BEGIN - install docker in case not yet done - in our case for Ubuntu
> sudo apt-get install -y apt-transport-https \
    ca-certificates curl gnupg-agent \
    software-properties-common make
> curl -fsSL https://download.docker.com/linux/ubuntu/gpg | sudo apt-key add -
> sudo add-apt-repository \
   "deb [arch=amd64] https://download.docker.com/linux/ubuntu \
   $(lsb_release -cs) \
   stable"
> sudo apt-get update
> sudo apt-get install -y docker-ce docker-ce-cli containerd.io
> sudo apt-get install -y docker-compose
> sudo groupadd docker
> sudo usermod -aG docker $USER
# END of Docker installation
# You might need to logout and login to active the docker group access rights
#
# Create the SLURM 19.05.1 containers (SLURM version can be adapted)
#
> cd slurm-in-docker/
> make                  # building will take some minutes
# ... lots of output ;) .............................
> docker images
REPOSITORY                      TAG                 IMAGE ID            CREATED             SIZE
scidas/slurm.database           19.05.1             035a7fb27574        3 days ago          828MB
scidas/slurm.worker             19.05.1             6faf0d7804f7        3 days ago          1.31GB
scidas/slurm.controller         19.05.1             e2445edbad54        3 days ago          1.31GB
scidas/slurm.base               19.05.1             668e97c1fb7b        3 days ago          805MB
scidas/slurm.rpms               19.05.1             8b5682048fee        3 days ago          885MB
centos                          7                   7e6257c9f8d8        6 weeks ago         203MB
krallin/centos-tini             7                   748636d1c058        16 months ago       226MB
> docker-compose up -d  # start the environment
Creating network "slurmindocker_slurm" with the default driver
Creating controller ...
Creating controller ... done
Creating worker01 ...
Creating database ...
Creating worker02 ...
Creating worker01
Creating database
Creating worker02 ... done
> docker exec -ti controller sinfo -lN
NODELIST   NODES PARTITION       STATE CPUS    S:C:T MEMORY TMP_DISK WEIGHT AVAIL_FE REASON
worker01       1   docker*        idle    1    1:1:1   1800        0      1   (null) none
worker02       1   docker*        idle    1    1:1:1   1800        0      1   (null) none
> docker exec -ti controller srun -N 2 hostname
worker02
worker01
> docker exec -ti controller srun --mpi=list
srun: MPI types are...
srun: pmi2
srun: openmpi
srun: none
> docker exec -ti controller ompi_info
# ......... OpenMPI info output .......
# Test OpenMPI
> cat > home/worker/mpi_hello.c << EOF
/******************************************************************************
 * * FILE: mpi_hello.c
 * * DESCRIPTION: MPI tutorial example code: Simple hello world program
 * * AUTHOR: Blaise Barney
 * * LAST REVISED: 03/05/10
 * ******************************************************************************/
#include <mpi.h>
#include <stdio.h>
#include <stdlib.h>
#define  MASTER 0

int main (int argc, char *argv[]) {
   int   numtasks, taskid, len;
   char hostname[MPI_MAX_PROCESSOR_NAME];

   MPI_Init(&argc, &argv);
   MPI_Comm_size(MPI_COMM_WORLD,&numtasks);
   MPI_Comm_rank(MPI_COMM_WORLD,&taskid);
   MPI_Get_processor_name(hostname, &len);

   printf ("Hello from task %d on %s!\n", taskid, hostname);

   if (taskid == MASTER)
      printf("MASTER: Number of MPI tasks is: %d\n",numtasks);

   //while(1) {}

   MPI_Finalize();
}
EOF
> docker exec -ti worker01 mpicc mpi_hello.c -o mpi_hello.out
> docker exec -ti worker01 srun -N 2 --mpi=openmpi mpi_hello.out
Hello from task 1 on worker02!
Hello from task 0 on worker01!
MASTER: Number of MPI tasks is: 2
# disable message about missing openib in case with the following setting
# docker exec -ti worker01 bash -c "export \
# OMPI_MCA_btl_base_warn_component_unused=0; srun -N 2 --mpi=openmpi mpi_hello.out"
# login to a worker container
> docker exec -ti worker01 bash
# and finally shutdown the SLURM container environment
> sh teardown.sh
# docker-compose stop
# docker-compose rm -f
# docker volume rm slurmindocker_home slurmindocker_secret
# docker network rm slurmindocker_slurm
In case the controller constantly restarts with messages like
sacctmgr: error: Malformed RPC of type PERSIST_RC(1433) received
sacctmgr: error: slurm_persist_conn_open: Failed to unpack persistent connection init resp message from database:6819 :
sh teardown.sh
rm -rf home/worker/.ssh/*
sudo rm -rf secret/*
docker-compose up -d
Have a look at our other technical guides related to the high-end remote desktop software NICE DCV and EnginFrame HPC and session management portal. If there are any questions let us know.
Commercial Support for SLURM
Our experienced technical team offers professional support for SLURM for commercial and academia customers. We help you solve issues with your SLURM installation via Email, Phone and Webconf. In case you are interested let us know at ![]() or via our contact form.
or via our contact form.


