Setting up EnginFrame can be some effort for new users so we have created an automatic container build to make integration of EnginFrame with a DCV Session Manager installation easy.
How to build the EnginFrame container
To build the container we need a container runtime. In our example we use Podman but Docker will work fine as well.
The build procedure expects that you have requested an EnginFrame trial license for free beforehand which you can do e.g. here.
First install Podman (we assume you are running Ubuntu, the installation is similar for other OS):
sudo apt-get update
sudo apt-get -y install podman
Download the EnginFrame container build tarball and extract it:
> wget https://www.ni-sp.com/wp-content/uploads/2019/10/ef-container-build.tgz
> tar zxvf ef-container-build.tgz
> cd ef-container-build/
> ls -al
-rwxrwxr-x 1 ubuntu ubuntu      1279 Jul 13 15:42 BUILD.sh
-rw-rw-r-- 1 ubuntu ubuntu      2852 Jul 13 14:28 Dockerfile
-rw-rw-r-- 1 ubuntu ubuntu       752 Jul 13 14:20 cluster.props
-rwxrwxr-x 1 ubuntu ubuntu      1003 Jul 13 14:28 ef-setup.sh
-rw-rw-r-- 1 ubuntu ubuntu     18577 Jul 13 14:20 efinstall.config
-rw-rw-r-- 1 ubuntu ubuntu       319 Jul 13 14:20 grid.conf
-rw-r--r-- 1 ubuntu ubuntu      2002 Jul 13 14:20 interactive_67b1146427784051af628d097a61a631.tgz
-rw-rw-r-- 1 ubuntu ubuntu      2654 Jul 13 14:20 interactive_67b1146427784051af628d097a61a631.xml
-rw-rw-r-- 1 ubuntu ubuntu      2623 Jul 13 14:20 interactive_builtin_linux_desktop.xml
-rw-rw-r-- 1 ubuntu ubuntu      2732 Jul 13 14:20 interactive_builtin_linux_desktop_virtual.xml
-rw-rw-r-- 1 ubuntu ubuntu      2619 Jul 13 14:20 interactive_builtin_windows_desktop.xml
-rw-rw-r-- 1 ubuntu ubuntu      2392 Jul 13 14:27 nat.conf
As next step we configure the file cluster.props to match the configuration of our DCV Session Manager Broker installation (please adapt all 4 configuration lines accordingly; here is an example):
# Configuration for cluster dcvsm_cluster1
DCVSM_CLUSTER_dcvsm_cluster1_AUTH_ID=076fdba1-221c-4f60-b1f5-b99ae6b0dd35
DCVSM_CLUSTER_dcvsm_cluster1_AUTH_PASSWORD=Y2QwYTI4ODYtZDU0NS00NjdjLTk3NzYtNDE5OWJiNGI1YmIy
DCVSM_CLUSTER_dcvsm_cluster1_AUTH_ENDPOINT=https://localhost:8448/oauth2/token
DCVSM_CLUSTER_dcvsm_cluster1_SESSION_MANAGER_ENDPOINT=https://localhost:8448
Download a supported Java version like Java 8 or 11. In our example we download Java 8u202 (jdk-8u202-linux-x64.tar.gz) into the extracted directory and copy the EnginFrame trial license as license.ef in the same directory and run the BUILD.sh script (in our container build we use a Centos 7 docker image as base which you can easily replace with your preferred one):
> bash BUILD.sh
STEP 1/26: FROM docker.io/openmicroscopy/omero-ssh-systemd
STEP 2/26: MAINTAINER nisp
--> Using cache 1765fd744e51912066e7620865b3f9d183f9d7e925e764212417ecb600ed983f
--> 1765fd744e5
STEP 3/26: RUN yum install -y git vim telnet lsof
--> Using cache a828808edb7c896658e881449e574b7917453c12290697f5bb900b0df8320858
--> a828808edb7
STEP 4/26: RUN yum clean all
--> Using cache 1f9c8b94f1b6e280aebe517f2874949269c7ba938a574557f3d7bf1795ce18ac
--> 1f9c8b94f1b
STEP 5/26: ADD jdk-8u202-linux-x64.tar.gz /opt/jdk-linux-x64
--> Using cache 39e95cf82a5612a3dc32fd38e1fc6b81bdd7ae728819de3d3df94bc656611c9d
--> 39e95cf82a5
STEP 6/26: ADD enginframe-2021.0-r1657.jar /enginframe-2021.0-r1657.jar
--> Using cache 998bdb14327d1a615b9a56d5657b6009ba047feab1dcaac6ce4715e09c6ede34
--> 998bdb14327
STEP 7/26: ADD license.ef /lic.ef
--> Using cache d5485b58537de889619686626f91c576b5a0b0861dbaf60a1ca086c98787181f
--> d5485b58537
STEP 8/26: RUN touch /usr/bin/locale-check && chmod 755 /usr/bin/locale-check
--> Using cache 38179c40bc389af25962cce2302951ae91190e1c5786eac5e50c95167c1750a4
--> 38179c40bc3
STEP 9/26: RUN useradd -u 1001 efadmin # && mkdir /home/efadmin && chown efadmin /home/efadmin
--> Using cache c445f5d33e2fccd44b3e0cd2964e94393327a476c15e14408883b3e5c2a36c07
--> c445f5d33e2
STEP 10/26: RUN useradd -u 1002 efnobody # && mkdir /home/efnobody && chown efnobody /home/efnobody
--> Using cache 8d4876fe7f80b9d8d063e8e5e8ff497b241c5f0ee6d7045809a65896764941a7
--> 8d4876fe7f8
STEP 11/26: RUN echo "#\\n# local config \\n#" >> /root/.bashrc
--> Using cache 930548d7aa0290ed7addc3d9c0535afd06a9cb7a5b014be5ffa20f99ed8db953
--> 930548d7aa0
STEP 12/26: RUN echo "alias l=\"ls -al\"" >> /root/.bashrc
--> Using cache b6f9bffd50332eb44377d7037b76d737f87b68e3cce47dce05fd3fda74bc964b
--> b6f9bffd503
STEP 13/26: RUN echo "export JAVA_HOME=/opt/jdk-linux-x64/jdk1.8.0_202" >> /root/.bashrc
--> Using cache ce267f114a206477e11ecdd23a39008902db24da7e815e654edd47ea5b5f8e81
--> ce267f114a2
STEP 14/26: RUN echo "export PATH=/opt/jdk-linux-x64/jdk1.8.0_202/bin:$PATH" >> /root/.bashrc
--> Using cache ec97d525bff68d754868d7769a771d8887db7255fa8c26ff455457e1b143cb5c
--> ec97d525bff
STEP 15/26: ADD efinstall.config /tmp/efinstall.config
--> Using cache 827cf382807839741fe06a31eb991ffe929ee6b0e8ca8990280ffe32a529a430
--> 827cf382807
STEP 16/26: RUN cd /tmp && /opt/jdk-linux-x64/jdk1.8.0_202/bin/java -jar /enginframe-2021.0-r1657.jar --batch
--> Using cache 3e425504c91774c942d202934a2e47e35d608ade78a0876664aa3aa121573bbb
--> 3e425504c91
STEP 17/26: ADD cluster.props /opt/nice/enginframe/conf/plugins/dcvsm/clusters.props
--> Using cache e64699bc7ffcaeb0f162d8a32e09e796817c5903ac795e2d1e77ffcb4204ec53
--> e64699bc7ff
STEP 18/26: RUN chmod 600 /opt/nice/enginframe/conf/plugins/dcvsm/clusters.props && chown efnobody:efnobody /opt/nice/enginframe/conf/plugins/dcvsm/clusters.props
--> Using cache 604213dd6a99d85d22c094df5dcca20f5f6b11ebb79ead9c55845b1d2d5ec9e4
--> 604213dd6a9
STEP 19/26: ADD grid.conf /opt/nice/enginframe/conf/plugins/grid/grid.conf
--> Using cache 4a85c0a90fd13b27a945cb298824c4117836db26a43bd9206090773d8cf0a2fe
--> 4a85c0a90fd
STEP 20/26: ADD nat.conf /opt/nice/enginframe/conf/plugins/interactive/nat.conf
--> Using cache a5cd1306dac47e203c873cd807d0d811b7736ab1db97b74c9cc0e2c6927f0619
--> a5cd1306dac
STEP 21/26: ADD interactive_builtin_linux_desktop.xml /opt/nice/enginframe/data/plugins/vdi/services/published/interactive_builtin_linux_desktop.xml
--> Using cache ad889e471ec9d1328e5a600262eef17f8d34da3b115fd310003186d046e3bb13
--> ad889e471ec
STEP 22/26: ADD interactive_67b1146427784051af628d097a61a631.xml /opt/nice/enginframe/data/plugins/vdi/services/published/interactive_67b1146427784051af628d097a61a631.xml
--> Using cache a4413ea657adcf09aa51966e50d4d7cc4bd244579f4b3c6a0c87428227d2162d
--> a4413ea657a
STEP 23/26: ADD interactive_67b1146427784051af628d097a61a631.tgz /opt/nice/enginframe/data/plugins/vdi/services/catalog/
--> Using cache bad9c30326b0ced24ce03e5234e7b8e0c89ac966a50fb434d973df4762b9b64b
--> bad9c30326b
STEP 24/26: ADD interactive_builtin_windows_desktop.xml /opt/nice/enginframe/data/plugins/vdi/services/published/interactive_builtin_windows_desktop.xml
--> Using cache 6bb2ce6892d078aa9ed6faeb9f4ee8ee20b76f95f263c3fd457d2b6bf8a1f294
--> 6bb2ce6892d
STEP 25/26: ADD ef-setup.sh /setup.sh
--> Using cache b6d7af03978c79a61eede1f39aac69b712c718c5e064bc66bb52ef406b040a44
--> b6d7af03978
STEP 26/26: CMD [ "/setup.sh", "nobash" ]
--> Using cache a5f04fe734cfc8352ed3912c3f49a0e4a292ab7e588e99162f3637abed8624a5
COMMIT nisp/enginframe
--> a5f04fe734c
Successfully tagged localhost/nisp/enginframe:latest
Successfully tagged localhost/nisp/enginframe:2021.0
a5f04fe734cfc8352ed3912c3f49a0e4a292ab7e588e99162f3637abed8624a5
> podman image ls         # check if the container has been built
REPOSITORY                                  TAG         IMAGE ID      CREATED      SIZE
localhost/nisp/enginframe                   latest      a5f04fe734cf  2 hours ago  1.31 GB
localhost/nisp/enginframe                   2021.0      a5f04fe734cf  2 hours ago  1.31 GB
docker.io/openmicroscopy/omero-ssh-systemd  latest      beae2be239ee  5 years ago  234 MB
The container build procedure creates a script startef.sh which you can run with the following command to start the EnginFrame container:
#
# Start the EnginFrame container with the automatically built script startef.sh
#
> bash startef.sh
ef
aba616dc0d3664f829c954d0032831815333cdcb96f4535d521c5ff5154f2cab
af70a8f5dbcff03d68023e4db7cca5a709bb1a00f0554d284366fd0675d7ff6b
You can start a shell inside the EF container with: podman exec -it ef bash
The EnginFrame Url is: https://18.185.249.64:8553

#
# Verify that the container is running
#
> podman container ls
CONTAINER ID  IMAGE                             COMMAND           CREATED        STATUS            PORTS       NAMES
af70a8f5dbcf  localhost/nisp/enginframe:latest  /setup.sh nobash  2 minutes ago  Up 2 minutes ago              ef

#
# Check if the default port 8553 is used by the java process belonging to EnginFrame
#
> sudo lsof -n -P -i | grep 8553
java      110223          101001   57u  IPv4 719146      0t0  TCP *:8553 (LISTEN)

#
# Let's enter into the container with an interactive shell and check the processes
#
> podman exec -it ef bash
# Now we are inside the container
[root@master /]# ps -ef
UID          PID    PPID  C STIME TTY          TIME CMD
root           1       0  0 16:20 ?        00:00:00 /bin/bash /setup.sh nobash
efnobody     130       1  3 16:20 ?        00:00:09 /opt/jdk-linux-x64/jdk1.8.0_202/jre/bin/java -Dderby.system.home=/opt/nice/eng
efnobody     167       1 28 16:20 ?        00:01:07 /opt/jdk-linux-x64/jdk1.8.0_202/jre/bin/java -Djava.util.logging.config.file=/
root         170       1  2 16:20 ?        00:00:06 /opt/jdk-linux-x64/jdk1.8.0_202/jre/bin/java -Xms512m -Xmx512m -XX:HeapDumpPat
root        3137       0  0 16:24 pts/0    00:00:00 bash
root        3149       1  0 16:24 ?        00:00:00 sleep 1
root        3150    3137  0 16:24 pts/0    00:00:00 ps -ef
Now EnginFrame should be running on port 8553 as configured as default in the efinstall.config EnginFrame installer configuration file.
If necessary do not forget to adapt your firewall or routing to allow access to port 8553 where EnginFrame is listening. This port can be adapted in the built scripts and configuration.
Please note that for demo purposes passwords have been set with defaults which should be changed in a productions environment.
Login to EnginFrame and Start a DCV Session
You can access the EnginFrame VDI Portal at https://IP_OF_EF:8553/enginframe/vdi/vdi.xml?_uri=%2F%2Fcom.enginframe.grid%2Flist.hosts (please replace the DNS name or IP address).
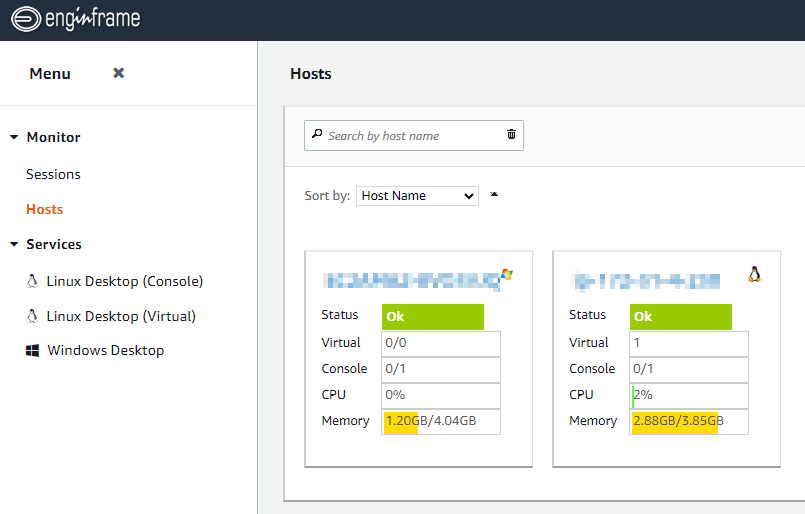
After logging with e.g. user efadmin and password efadmin (please change for production) and DCV Session Manager integration is working fine you can see the following host view and services in this case for a Windows and Linux DCV server:
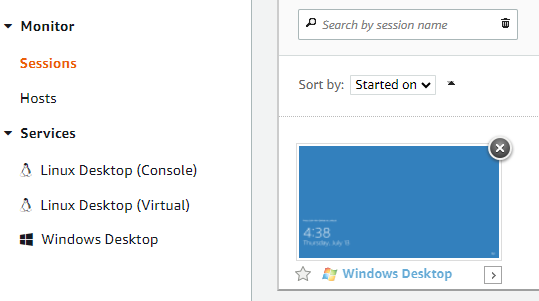
After creating e.g. a Windows Desktop session we will be redirected to the session view and by default a new tab will be opened with the DCV Windows session in the browser. The default can be changed in the ![]() to the upper right where you can select to start the DCV session with the DCV Desktop Client in case installed.
to the upper right where you can select to start the DCV session with the DCV Desktop Client in case installed.
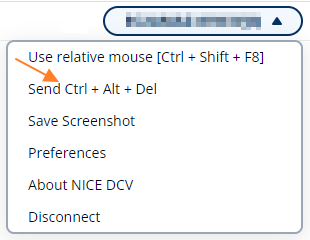
When presented with the Windows logon screen in the DCV session you can in case needed trigger Ctrl-Alt-Delete in the upper right of the DCV browser session:
Any questions or in case you need a free EnginFrame trial license just let us know.


