Configure custom PAM auth for NICE DCV Server
If you want to customize any steps during PAM authentication, like execute scripts during the login process or connect in remote auth system, you can change the PAM DCV Server file. Please follow the next topics.
- First, edit the file
/etc/dcv/dcv.confand set or add, if is not active, this line:pam-service-name="dcv.custom" - Now we need to create the
/etc/pam.d/dcv.customfile. To understand the content, please check the next topics. If you do not change the name, the default pam file is/etc/pam.d/dcv.
Trying local auth, SSSD auth and Kerberos auth
- Create the file
/etc/pam.d/dcv.customwith this content:auth include dcv-password-auth
account include dcv-password-auth - Create the file /etc/pam.d/dcv-password-auth with this content:
# Load environment variables
auth        required      pam_env.so

# Introduce a delay on authentication failure to slow down brute-force attempts
auth        required      pam_faildelay.so delay=2000000

# Try local authentication first
# If successful, skip next auth module; if fails, continue to next
auth        [success=1 default=ignore]  pam_unix.so nullok try_first_pass

# If local fails, try SSSD
# If successful, skip next auth module; if fails, continue to next
auth        [success=1 default=ignore]  pam_sss.so use_first_pass

# If SSSD fails, try Kerberos
# If successful, skip next auth module; if fails, continue to next
auth        [success=1 default=ignore]  pam_krb5.so use_first_pass

# If all above fail, deny access
auth        required      pam_deny.so

# Check account validity using local passwd file
account     required      pam_unix.so

# Check account validity using SSSD
# Ignore if user unknown, succeed if check passes, fail otherwise
account     [default=bad success=ok user_unknown=ignore] pam_sss.so

# Check account validity using Kerberos
# Ignore if user unknown, succeed if check passes, fail otherwise
account     [default=bad success=ok user_unknown=ignore] pam_krb5.so

# Check password quality for local users
password    requisite     pam_pwquality.so local_users_only

# Change password in local passwd file
# Use SHA512 hashing, allow empty passwords if configured
password    sufficient    pam_unix.so sha512 shadow nullok use_authtok

# Change password in SSSD
password    sufficient    pam_sss.so use_authtok

# Change password in Kerberos
password    sufficient    pam_krb5.so use_authtok

# If all password changes fail, deny the password change
password    required      pam_deny.so

# Set up kernel keyring for the session
session     optional      pam_keyinit.so revoke

# Apply resource limits from /etc/security/limits.conf
session     required      pam_limits.so

# Register the session with systemd
-session    optional      pam_systemd.so

# Create home directory on first login
session     optional      pam_mkhomedir.so

# Skip session setup for cron jobs
session     [success=1 default=ignore] pam_succeed_if.so service in crond quiet use_uid

# Set up user session (update login records, etc.)
session     required      pam_unix.so

# Set up SSSD session (if SSSD is being used)
session     optional      pam_sss.so

# Set up Kerberos session (if Kerberos is being used)
session     optional      pam_krb5.so
Important: If you are using SSSD, then you need to add dcv.custom PAM file into your SSSD domain config to allow this script:ad_gpo_map_service = +dcv.custom
Executing a script during auth process
You need to create your dcv.custom file (like was explained in the previous tutorial), but you will add one extra line in the dcv.custom file, like this:
auth required pam_exec.so /usr/bin/dcv_local_sessions
auth include password-auth
account include password-auth
The script /usr/bin/dcv_local_sessions will be executed after sucessful login, but before the end of the auth procedure.
No PEM-encoded certificate found
The error “No PEM-encoded certificate found” means that the server couldn’t load the certificate in file dcv.pem.
The files must be placed in C:\Windows\System32\config\systemprofile\AppData\Local\NICE\dcv (not in the “private” subdirectory) and must be named dcv.pem and dcv.key. Check that the files are readable by the SYSTEM account.
You can check that the dcv.pem certificate is valid with the following PowerShell command:
[System.Security.Cryptography.X509Certificates.X509Certificate2]::CreateFromCertFile("C:\Windows\System32\config\systemprofile\AppData\Local\NICE\dcv\dcv.pem")In alternative, you can install the openssl CLI tools and run:
openssl x509 -in C:\Windows\System32\config\systemprofile\AppData\Local\NICE\dcv\dcv.pem -textTurning off the DCV authentication for test purposes
Windows
To change the authentication method on Windows server-side
- Open the Windows Registry Editor.
- Navigate to the HKEY_USERS\S-1-5-18\Software\GSettings\com\nicesoftware\dcv\security\
- key and select the authentication parameter. If there is no authentication parameter in the registry key, create one:
- In the left-hand pane, open the context (right-click) menu for the authentication key and choose New, string value.
- For Name, type authentication and press Enter.
- Open the authentication parameter. For Value data, enter either system or none.
- Choose OK and close the Windows Registry Editor.
Linux
Edit the /etc/dcv/dcv.conf file and set:
[security]
authentication=none
Save and close the file. Then restart the DCV server:
systemctl restart dcvserverMulti-Factor-Authentication (MFA) for DCV
Overview
Multi-Factor-Authentication (MFA) is becoming more and more important to raise the security level of applications. Integration of NICE DCV and EnginFrame with MFA is easy and adds additional security.
MFA typically integrates with PAM on the DCV server side in case of Linux. MFA integrations typically support
- LDAP
- Radius
as well as other authentication backends.
Here is the MFA authentication flow with PAM integration using an example MFA application. Other MFA applications like Microsoft Authenticator or OKTA (please see below) are supported as well:
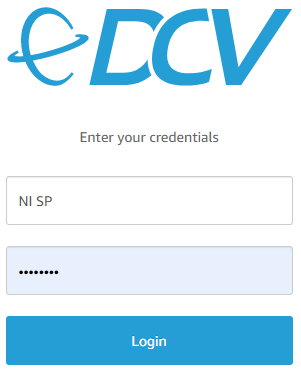
(User logs in)
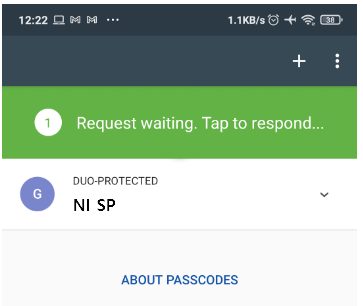
(User receives a request to acknowledge the login request e.g. on the mobile phone)
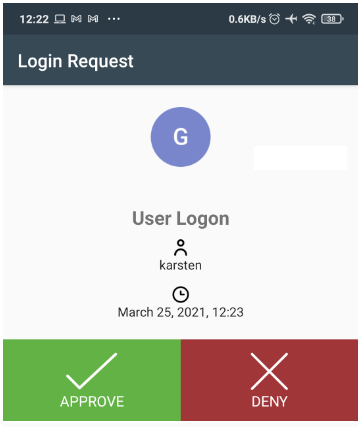
(User approves the login by clicking on the green button)

(And gets approved and logged in)
After acknowledging the MFA authorization request in the application e.g. on the mobile phone the login process is finished and the user logged in.
The same approach can be used to apply MFA to authenticate users when login into EnginFrame.
Microsoft Entra ID and MFA
If you want to use MFA from Microsoft Entra, you will need to integrade the Entra ID with your Linux PAM (Pluggable Authentication Modules) using SSSD (System Security Services Daemon) service.
You can do the integration checking the article: https://www.ni-sp.com/knowledge-base/dcv-general/authentication/#h-pam-sssd-entra-id-integration
NICE DCV External Authentication
NICE DCV offers an external authentication mechanism which allows to e.g. verify a token which has been sent with the DCV login request and delegate the authentication to an authentication verification script.
External authentication is e.g. used with the EnginFrame Views session management integrated with DCV to provide single-sign on (SSO) for Linux VDI sessions.
You need to download and setup the package nice-dcv-simple-external-authenticator, that come with NICE DCV Server. You can download from the NICE DCV download page.
After installed, you need to create this directory:
sudo mkdir -p /var/run/dcvsimpleextauthTo create a valid token, you need to execute:
echo "c54Ctvy76Vubi32T42323GG" | sudo dcvsimpleextauth add-user --session console --auth-dir /var/run/dcvsimpleextauth/ --user ubuntu --append- “c54Ctvy76Vubi32T42323GG” is the token code, can be a a good amount of characters to authenticate the client users
- “console” is the session id.
- ” /var/run/dcvsimpleextauth/” is the directory to store the tokens.
- “ubuntu” is the user to store.
Now we need to startup a server that will read the created tokens and make them available:
sudo dcvsimpleextauth --port 8444 --auth-dir /var/run/dcvsimpleextauth/ start-serverThen you can create the complete URL to connect:
https://dcvserverip:dcvserverport?authToken=c54Ctvy76Vubi32T42323GG#console
For example:
https://1.2.3.4:8447?authToken=c54Ctvy76Vubi32T42323GG#console
- “https://” is the encrypted http
- “1.2.3.4” is the DCV Server IP/DNS
- “8447” is the DCV server port
- “?authToken=c54Ctvy76Vubi32T42323GG’ is the token that you created
- “#console” is the session id
You can read more about NICE DCV external authentication at: https://docs.aws.amazon.com/dcv/latest/adminguide/external-authentication.html. A sampe external authentication implementation python script can be found in the NICE DCV Linux distribution.
Let us know if you have any questions regards MFA integration via our contact form. More background on NICE DCV and NICE DCV Tips and Tricks.
Using Microsoft Active Directory / Entra ID to Linux Authentication
Overview
By default the linux system authentication use the PAM library (ref: what is PAM). We are aware that there is a module called pam_aad (pam_aad) that can be used to directly integrate PAM with AD, however this module is not officialy supported anymore by the community.
To offer a complete and supported AD integration, we can use LDAP (ref: what is LDAP) or SSSD (ref: what is SSSD).
If you already have Open LDAP configured, plase skip the installing topic.
Note: Microsoft Active Directory was renamed to Microsoft Entra ID (ref: active directory renamed)
The Entra ID intgration can be done using:
- PAM + LDAP, if you already have LDAP installed or want to use LDAP
- PAM + SSSD, you want a simple way to integrate PAM with Entra ID with any Linux distro
- PAM + AUTHD, if you are using very recent Debian (12+) and Ubuntu (24.04+)
PAM + LDAP + Entra ID integration
Installing Open LDAP
RedHat based systems, like CentOS
Open LDAP package as removed in EL8, so we will use Symas repository to provide updated Open LDAP package.
Please follow this steps to setup Open LDAP:
- Configuring the repository:
yum erase openldap-clients openldap-servers
7 version:wget -q https://repo.symas.com/configs/SOFL/rhel7/sofl.repo -O /etc/yum.repos.d/sofl.repo
8 version:wget -q https://repo.symas.com/configs/SOFL/rhel8/sofl.repo -O /etc/yum.repos.d/sofl.repo - Installing the Open LDAP service:
yum install symas-openldap-clients symas-openldap-servers - Starting the service:
systemctl enable --now slapd - Edit the file
/etc/openldap/ldap.confand look for:# BASE dc=example,dc=com
# URI ldap://ldap.example.com ldap://ldap-master.example.com:666
and replacd withBASE dc=my,dc=ldapserver,dc=com
URI ldap://my.ldapserver.com
Note: replace my.ldapserver.com URI with your comand and then the BASE config. And pay attention to replace both configs in the rest of this tutorial. - Now execute the command slappasswd and create a password that will be used for Open LDAP root user (olcRootPW):
slappasswdCopy the hash that will be printed. - Create a file callend
rootpw.ldifand add this content:dn: olcDatabase={0}config,cn=config
changetype: modify
add: olcRootPW
olcRootPW: {SSHA}VoN6YuL6fTIWzT6xy41SpPDrfP4ce1Zx
Note: The hash{SSHA}VoN6YuL6fTIWzT6xy41SpPDrfP4ce1Zxis just an example. You need to create one for you withslappasswdcommand. - Then execute this ldif file:
ldapadd -Y EXTERNAL -H ldapi:/// -f rootpw.ldif - We need to import basic Open LDAP schemes . Please execute the follow commands:
ldapadd -Y EXTERNAL -H ldapi:/// -f /etc/openldap/schema/cosine.ldifldapadd -Y EXTERNAL -H ldapi:/// -f /etc/openldap/schema/nis.ldifldapadd -Y EXTERNAL -H ldapi:/// -f /etc/openldap/schema/inetorgperson.ldifldapadd -Y EXTERNAL -H ldapi:/// -f /etc/openldap/schema/openldap.ldifldapadd -Y EXTERNAL -H ldapi:/// -f /etc/openldap/schema/dyngroup.ldif - We also need to create a manager user for Open LDAP. We can use same root password if you think it is ok or execute slappasswd command again and create a new password. Create a file called
manager.ldifand set this content:dn: olcDatabase={2}mdb,cn=config
changetype: modify
replace: olcSuffix
olcSuffix: dc=my,dc=ldapserver,dc=com
dn: olcDatabase={2}mdb,cn=config
changetype: modify
replace: olcRootDN
olcRootDN: cn=Manager,dc=my,dc=ldapserver,dc=com
dn: olcDatabase={2}mdb,cn=config
changetype: modify
add: olcRootPW
olcRootPW: {SSHA}VoN6YuL6fTIWzT6xy41SpPDrfP4ce1Zx
Note: Please remember to replace the domain config (dc=my,dc=ldapserver,dc=com) with your domand - Then you can apply:
ldapmodify -Y EXTERNAL -H ldapi:/// -f manager.ldif - To create the Organization Group
org.ldiffile:dn: dc=my,dc=ldapserver,dc=com
objectClass: top
objectClass: dcObject
objectclass: organization
o: IBM RPA Server
dc: rpa
dn: cn=Manager,dc=my,dc=ldapserver,dc=com
objectClass: organizationalRole
cn: Manager
description: LDAP Manager
dn: ou=rpausers,dc=my,dc=ldapserver,dc=com
objectClass: organizationalUnit
ou: rpaUsers - Then apply with:
ldapadd -x -D cn=Manager,dc=my,dc=ldapserver,dc=com -W -f org.ldif
Note: replace domain config (dc=my,dc=ldapserver,dc=com) with your config.
Setup a LDAP certificate to support LDAPS
For testing purposes we will create the key, then the CSR file, but we will continue with self-signed certificate.
- Create the req.conf file:
[req]
distinguished_name = req_distinguished_name
req_extensions = v3_req
prompt = no
days = 365

[req_distinguished_name]
C = US
ST = US
L = LA
O = myorg
OU = myorgunit
CN = my.ldapserver.com

[ v3_req ]
basicConstraints       = CA:false
extendedKeyUsage       = serverAuth
subjectAltName         = @sans

[ sans ]
DNS.0 = localhost
DNS.1 = ldap.ldapserver.com- To create the CSR:
openssl req -new -out ldaps.csr -newkey rsa:2048 -nodes -sha256 -keyout ldaps.key -config req.conf- Check if your CSR file is right:
openssl req -noout -text -in ldaps.csr- Verify your private key:
openssl rsa -in ldaps.key -check- Finally create the self signed certificate:
openssl x509 -req -days 3650 -in ldaps.csr -signkey ldaps.key -out ldaps.crt- And convert the certo to PKCS12 format:
openssl pkcs12 -export -out ldaps.pfx -inkey ldaps.key.temp -in ldaps.crt- Edit the file
/etc/nslcd.confand set or add this config:tls_reqcert allow
It will allow self-signed certs. - Copy the certs to
/etc/openldap/cacerts/mkdir -p /etc/openldap/cacerts
cp ldaps.csr /etc/openldap/cacerts/
cp ldaps.crt /etc/openldap/cacerts/
cp ldaps.key /etc/openldap/cacerts/
cp ldaps.pfx /etc/openldap/cacerts/
- And then fix the permissions:
chown -R ldap:ldap /etc/openldap/cacerts/ - Create a file called certs.ldif with this content:
dn: cn=config
changetype: modify
replace: olcTLSCertificateFile
olcTLSCertificateFile: /etc/openldap/certs/ldaps.crt
dn: cn=config
changetype: modify
replace: olcTLSCertificateKeyFile
olcTLSCertificateKeyFile: /etc/openldap/certs/ldaps.key - And finally apply the the ldif file:
ldapmodify -Y EXTERNAL -H ldapi:/// -f certs.ldif - Finally, check if the LDAP config is correct with:
slaptest -u
Integrating LDAP with Microsoft Active Directory / Entra ID
Now you need to follow the official guide to connect Generic LDAP Connector into your LDAP:
- https://learn.microsoft.com/en-us/microsoft-identity-manager/reference/microsoft-identity-manager-2016-connector-genericldap
- https://learn.microsoft.com/en-us/entra/identity/domain-services/tutorial-configure-ldaps
Important notes:
- Microsot does not recommend to use self-signed certificates.
- You can connect Entra ID with your LDAP using self-signed certificate.
- Besides you can disable Secure LDAP (LDAPS) in Microsoft Entra ID, do not do that; You can expose your users data withotu encrypting the traffic,
Configuring Linux PAM to use LDAP
There is a PAM module called libpam-ldapd (ref: what is libpam-ldap) that can integrate PAM and LDAP protocol. This PAM module is the newest alternative of old libpam-ldap. This module already come installed with almost all distros, but you can check, usually in /usr/lib64/security/, if you have the pam_ldap.so module. If not, then you need to setup libpam-ldapd package. The name can change according each distro.
libpam-ldapd uses the same backend (nslcd) as libnss-ldapd, and thus also shares the same configuration file (/etc/nslcd.conf).
In order to globally enable LDAP authentication through PAM, configure /etc/pam_ldap.conf and edit the /etc/pam.d/common-* files so that they contain something like the examples below. We say something because it will depends of your distro and your customizations, but is simple.
/etc/pam.d/common-account:
account     required      pam_unix.so
account     sufficient    pam_succeed_if.so uid < 1000 quiet
account     [default=bad success=ok user_unknown=ignore] pam_ldap.so
account     required      pam_permit.so
/etc/pam.d/common-auth:
auth    sufficient      pam_unix.so nullok_secure
auth    requisite       pam_succeed_if.so uid >= 1000 quiet
auth    sufficient      pam_ldap.so use_first_pass
auth    required        pam_deny.so
/etc/pam.d/common-password:
session     required      pam_limits.so
session     required      pam_unix.so
session     optional      pam_ldap.so
Important note: If you have GPO rules being applied from your Active Directory, you must translate the GPO rules to all custom PAM configuration files that you created, specially if you have ad_gpo_default_right configured as Deny. You may need to apply custom PAM scripts into ad_gpo_map_remote_interactive or ad_gpo_map_service. If you have, for example, a custom DCV server PAM config file you need to explicity map the GPO rule with PAM.
PAM + SSSD + Entra ID integration
Overview
Important notes:
- Direct integration with SSSD works only within a single AD forest by default.
- Windows supported versions: 2008, 2012 R2, 2016, 2019 and 2022.
Installing and configuring SSSD
RedHat based systems, like CentOS
- Install the service with the command:
yum install samba-common-tools realmd oddjob oddjob-mkhomedir sssd sssd-tools adcli krb5-workstation - Use the authconfig tool to enable SSSD
authconfig --enablesssd --update
This command will update the file /etc/nsswitch.confto have:passwd: files sss
shadow: files sss
group: files sss
netgroup: files sss - Edit the file
/etc/nsswitch.confand edit or add, if does not exist:services: files sss - Edit the file
/etc/sssd/sssd.conf(if does not exist, copy from/usr/lib64/sssd/conf/sssd.confto /etc/sssd/) and look for[sssd]section - Add nss as first option:
services = nss, pam - In the same file, look for the
[nss]section - And configure how SSSD will interact with nss:
[nss]
filter_groups = root
filter_users = root
entry_cache_timeout = 300
entry_cache_nowait_percentage = 75 - Enable and restart the sssd service:
systemctl enable sssd.service
systemctl restart sssd.service
Note: If the SSSD service fail to start, then please check what is the problem with the command:sssctl config-check
Configure SSSD to connect into Microsoft Entra ID
To join into Active Directory domain, follow these steps:
- First try to discover the AD domain to check if you are able to join into the domain:
realm discover ad.example.com - Then join into the domain:
realm join ad.example.com - To check if you it worked, please try to get any info from Active Directory user, like this:
getent passwd administrator@ad.example.com
You can check more details under this RedHat AD joining tutorial.
Configure PAM to use SSSD
- Execute the command below to enable SSSD for auth
authconfig --enablesssdauth --update
This will update the files/etc/pam.d/system-authand/etc/pam.d/password-authwith pam_sss module:[... file truncated ...]
auth required pam_env.so
auth sufficient pam_unix.so nullok try_first_pass
auth requisite pam_succeed_if.so uid >= 500 quiet
auth sufficient pam_sss.so use_first_pass
auth required pam_deny.so
[... file truncated ...] - Edit the file
/etc/sssd/sssd.confand look for[sssd]section - Check if pam service is listed, like this:
[sssd]
[... file truncated ...]
services = nss, pam - In the same file, look for the
[pam]section and configure how SSSD will interact with PAM:[pam]
offline_credentials_expiration = 2
offline_failed_login_attempts = 3
offline_failed_login_delay = 5 - Then restart the SSSD service:
systemctl restart sssd.service
Note: If the SSSD service fail to start, then please check what is the problem with the command:sssctl config-check
Important note: If you have GPO rules being applied from your Active Directory, you must translate the GPO rules to all custom PAM configuration files that you created, specially if you have ad_gpo_default_right configured as Deny. You may need to apply custom PAM scripts into ad_gpo_map_remote_interactive or ad_gpo_map_service. If you have, for example, a custom DCV server PAM config file you need to explicity map the GPO rule with PAM.
AUTHD + Entra ID integration
Overview
For Debian based distros, like Ubuntu, there is one alternative called authd (ref: https://github.com/ubuntu/authd).
Debian and Ubuntu
To integrate authd with your Linux, please setup the package below.
apt update && apt -y install authdThis command will install the authd the required modules for PAM and NSS and its dependencies.
For NSS it’ll update the file /etc/nsswitch.conf and add the service authd for the databases password, group and shadow.
For PAM it’ll update the files /etc/pam.d/common-auth, /etc/pam.d/common-account and /etc/pam.d/common-password to include the authd module.
Connecting authd with Microsoft Entra ID
Now you need to follow the Microsoft Entra ID official documentation to join into your domain: https://learn.microsoft.com/pt-br/entra/identity/domain-services/join-ubuntu-linux-vm
Avoiding write domain name in the Windows Login
If you are under a Windows Domain and you want to enter the credentials without have to type the domain, you can follow these steps:
- Run gpedit.msc
- Go to Computer Configuration → Windows Settings → Security Settings → Local Policies → Security Options
- Find “Network security: Default domain name”
- Set your domain name
You can also push through Group Policy:
- Computer Configuration → Administrative Templates → System → Logon → “Assign a default domain for logon”
Creating DCV connection file
You can create a .dcv file (that will be associated with DCV Viewer application) that can include the connection details (hostname, port, username, password, token, weburlpath etc), so you do not need to type everytime the credentials.
Here is a .dcv content file as example with parameters explained:
[version]
format=1.0

[connect]
host=
port=
sessionid=
user=
password=
authtoken=
proxytype=NONE
proxyhost=
proxyport=
proxypassword=
weburlpath=
transport=auto

[options]
fullscreen=
useallmonitors=
Explaining the parameters:
- host: The DCV Server or DCV Gateway hostname (DNS or IP)
- port: The DCV Server or DCV Gateway port
- authtoken: If you will use token to authenticate in DCV Server, you need to set the token here and also set the sessionid=
- sessionid: The session ID that identifies the session that you want to connect
- user and password: The credentials to authenticate in DCV Server if you do not want to use the token
- proxy parameters: Type (HTTPS, HTTP, SOCKS5|SOCKS, SYSTEM or NONE|DIRECT) , host, port and password to authenticate in proxy. SYSTEM is for your computer’s proxy settings.
- transport: Use “auto” to use QUIC/UDP as default protocol and WS/TCP as fallback protocol.
- weburlpath: Specifies the URL path for the embedded web server, must start with ‘/’. For example, setting it to /test/foo means that the web server is reachable at https://host:port/test/foo; Is useful if you have a proxy and you need to do a proxy pass to a backend.
More parameters you can find here.
Using the Browser to open the DCV Viewer application
If you create a browser shortcut with this URI:
DCV://<user>:<pass>@<IP>:<Port>#<Session-id>
It will open the DCV Viewer with those parameters.
For example:
DCV://francisco:frAnc1sc0@mydcvserver.domain.com:8443#franciscolinux
Using DCV Viewer without have to type user and password
You can get this in different ways. This make DCV very flexible to be integrated with most of all kind of environments.
- Using DCV without authentication: If you are in a safe network where this can be an option, you can follow this guide clicking here.
- Using DCV connection file: You can create a .dcv file with user and password to access your DCV server. Follow this guide to achieve that.
- Using DCV connection file with token: You can create a .dcv file that will use a token to access your DCV Server session. You can follow this guide to get the token and session id. You can also create your permanent token following this guide.
- Using browser shortcut: It will open the DCV Viewer with the parameters wrote in the browser shortcut. Follow this guide.
- Using EF Portal: A web dashboard where the user can do a login and download the connection file of all sessions that the user is allowed to connect. This is the most simple way as it does not require any technical knowledge from the user. For more details, please check here.
If you need some help, you can contact us.
Login not working due “not authorized in any channel”
If you re trying to login and you are seeing sucessful PAM login, but the message:
authenticator - skipping credential provider, client will not be allowed to connect: user "myuser" not authorized in any channelThis mean that you are trying to login into a DCV session with “myuser”, but “myuser” has no permission to enter in any session.
You need to create a session owned by the user “myuser” (–owner=myuser) or allow in default.perm file the user “myuser” to take over the session from other user.
For more about Dynamic Console Session (default.perm configuration) please check this guide.
Using Kerberos authentication with DCV
DCV Kerberos authentication allows to use Kerberos to authenticate (using GSSAPI) when establishing a DCV connection. It requires an Active Directory domain already configured and working on your system.
Note: The native Kerberos integration isn’t supported for the web client, a native client is required.
To use the Kerberos authentication in DCV requires changing the following configuration parameters.
In the connection settings set the following parameters:
- enable-gssapi – Enables or disables GSSAPI SASL mechanism, that allows DCV authentication with kerberos. Set the value to true.
- server-fqdn – Server fully qualified domain name. Empty means that
gethostname()will be used. Specify here your DCV server FQDN. - user-realm – Specifies a user realm for the server. Specify your domain realm.
Find complete documentation for the parameters and how to set them in the official parameters reference clicking here.
When create session you can use the command:
dcv create-session --owner USER@MY.DOMAIN.COM sessionnameerror in the auth token verifier: Error performing TLS
If your auth-token-verifier configuration does not offer TLS cert or is a self-signed or expired cert, you will get this error. You can ignore the check editing the dcv.conf and under [security] section, setup:
no-tls-strict=trueIt will ignore the TLS check and consider it safe to connect.


