How to enable the UDP based QUIC transport protocol in DCV
NICE DCV uses the WebSocket protocol, which is based on TCP, by default. As alternative you can run NICE DCV under QUIC protocol, which is based in UDP (WebSocket/TCP will still be used for authentication, to avoid security issues). If your network experiences high latency and packet loss, using QUIC might improve performance
Note: QUIC/UDP is not avaiable for web client due web browser UDP limitations.
Linux
Since 2024.0 version, QUIC is enabled by default. If you have and old version, QUIC can be enabled in dcv.conf in the connectivity section:
[connectivity]
enable-quic-frontend=true
enable-datagrams-display = always-off
After starting the DCV client (beginning with version 2020.2, you click on “Connection Settings” and in the “Advanced” tab you can choose QUIC transport:

Please note to enable the UDP traffic (UDP 8443 and TCP 8443 by default) to pass through the firewall or cloud security group in case.
To verify QUIC is used you can navigate in the DCV client to Settings (upper left) -> Streaming Mode and the popup should show (DCV 2020.1):

To test the difference of the DCV streaming modes you can switch easily between the TCP and QUIC/UDP mode in the settings of the client before connecting to the DCV session.
This NI SP demo video shows the difference in remote experience using TCP versus QUIC/UDP for higher latencies of ca. 100 msec: https://youtu.be/FDQumi0lPvA?t=282. Above ca. 50 – 70 msec latency we suggest to test how QUIC/UDP works for your use case.
For more background on QUIC from the NICE dev team head over to our news article How NICE DCV achieves 4K 60 fps high-quality interactive streaming with two videos from the DCV development team.
In case you want to enable QUIC Streams instead of the default QUIC Datagrams (more info: Background on QUIC Streams and QUIC Datagrams) you can use the following approach:
Starting with DCV 2023.1 you can add the following configuration in the [connectivity] section of your DCV configuration file for Linux DCV Servers. Please restart dcvserver after the change has been made.
[connectivity]
enable-datagrams-display = always-off
You can also configure QUIC Streams instead of QUIC Datagrams by starting the DCV client with the following option (Linux or MacOS):./dcvviewer --dqt-alpn-versions="Dcv20Basic"
Windows
To enable the high-FPS QUIC/UDP protocol offering by default 60 FPS e.g. on Windows DCV servers (starting with DCV version 2020.2) you can enable QUIC in the registry.
On the DCV server side you can use the Registry Editor to configure the key HKEY_USERS\S-1-5-18\Software\GSettings\com\nicesoftware\dcv\connectivity\enable-quic-frontend as 32-bit DWORD with the value 1:

Or using PowerShell:
New-ItemProperty -Path “Microsoft.PowerShell.Core\Registry::\HKEY_USERS\S-1-5-18\Software\GSettings\com\nicesoftware\dcv\connectivity” -Name enable-quic-frontend -PropertyType DWORD -Value 1 -Force
After starting the DCV client (beginning with version 2020.2, the web browser client does not support UDP) you click on “Connection Settings” and in the “Advanced” tab you can choose QUIC transport:
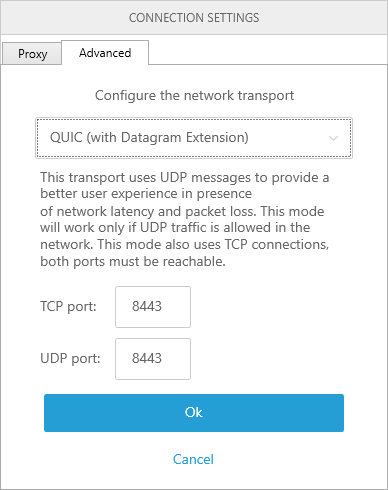
Please note to enable the UDP traffic (UDP 8443 and TCP 8443 by default) to pass through the firewall or cloud security group in case.
To verify QUIC is used you can navigate in the DCV client to Settings (upper left) -> Streaming Mode and the popup should show (DCV 2020.1):

To test the difference of the DCV streaming modes you can switch easily between the TCP and QUIC/UDP mode in the settings of the client before connecting to the DCV session.
This NI SP demo video shows the difference in remote experience using TCP versus QUIC/UDP for higher latencies of ca. 100 msec: https://youtu.be/FDQumi0lPvA?t=282. Above ca. 50 – 70 msec latency we suggest to test how QUIC/UDP works for your use case.
For more background on QUIC from the NICE dev team head over to our news article How NICE DCV achieves 4K 60 fps high-quality interactive streaming with two videos from the DCV development team.
In case you want to enable QUIC Streams instead of the default QUIC Datagrams (more info: Background on QUIC Streams and QUIC Datagrams) you can use the following approach:
Starting with DCV 2023.1 you can add the following configuration in the [connectivity] section of your DCV configuration file for Linux DCV Servers. Please restart dcvserver after the change has been made.
An in case of Windows DCV Servers the PowerShell setting:
New-ItemProperty -Path "Microsoft.PowerShell.Core\Registry::\HKEY_USERS\S-1-5-18\Software\GSettings\com\nicesoftware\dcv\connectivity" -Name enable-datagrams-display -PropertyType STRING -Value "always-off" -Force

New-ItemProperty -Path "Microsoft.PowerShell.Core\Registry::\HKEY_USERS\S-1-5-18\Software\GSettings\com\nicesoftware\dcv\connectivity" -Name enable-datagrams-display -Value always-off -force

You can also configure QUIC Streams instead of QUIC Datagrams by starting the DCV client with the following option:

On Windows:
dcvviewer.exe --enabled-quic-alpn-versions="Dcv20Basic"
Analyze GPU consumption with nVidia SMI and Process Explorer
Windows
You can find out how much GPU memory your applications are using with the nVidia tool nvidia-smi (/usr/bin/nvidia-smi) on Linux or C:\'Program Files'\'NVIDIA Corporation'\NVSMI\nvidia-smi.exe on Windows. With the option -a nvidia-smi will show full GPU details.
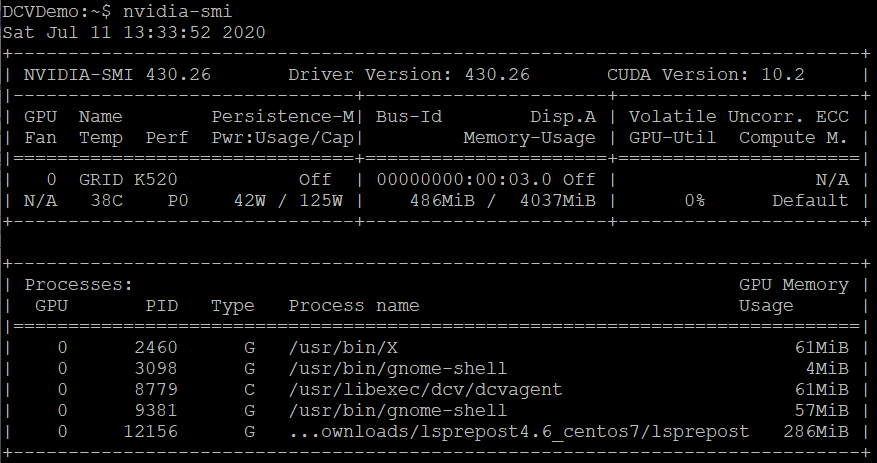
nvidia-smi on Linux with 10 Mio nodes LS-Dyna model loaded in LS-PrePost
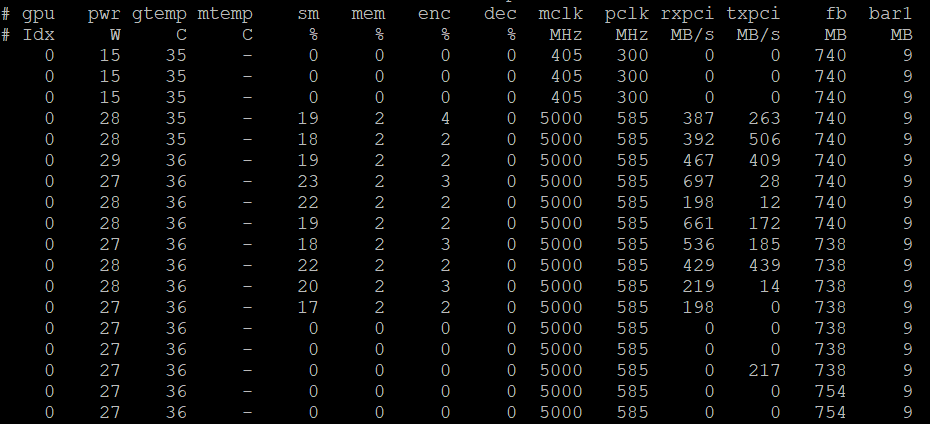
Monitoring the GPU status with nvidia-smi is available with the dmon option, e.g.nvidia-smi dmon -s puctm , which will allow to log values with respective options including utilization and PCIe bus throughput:
- p – Power Usage and Temperature
- u – Utilization
- c – Proc and Mem Clocks
- v – Power and Thermal Violations
- m – FB and Bar1 Memory
- e – ECC Errors and PCIe Replay errors
- t – PCIe Rx and Tx Throughput
and produce output similar to this which can be logged into a file as well:
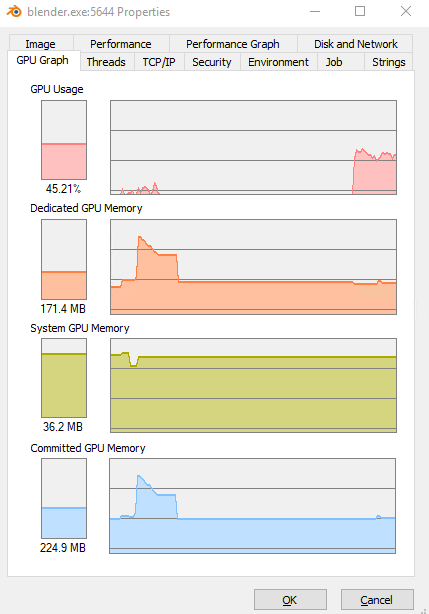
Another very helpful tool to understand GPU usage on Windows is Process Explorer (Microsoft Process Explorer). Here a sample output with GPU consumption by Blender:
Optimize nVidia GPU performance
Linux
For optimal performance of nVidia GPUs the clock settings are important. You can set specific clock rates depending on the application or configure Auto Boost to adapt the clock rates to the best values depending on application needs and the thermal situation.
You can query the present clock settings with nvidia-smi -q -i 0 -d CLOCK which will produce an output similar to this:
> nvidia-smi -q -i 0 -d CLOCK
==============NVSMI LOG==============

Driver Version                            : 450.89
CUDA Version                              : 11.0
Attached GPUs                             : 1
GPU 00000000:00:1E.0
    Clocks
        Graphics                          : 405 MHz
        SM                                : 405 MHz
        Memory                            : 324 MHz
        Video                             : 405 MHz
    Applications Clocks
        Graphics                          : 1177 MHz
        Memory                            : 2505 MHz
    Default Applications Clocks
        Graphics                          : 557 MHz
        Memory                            : 2505 MHz
    Max Clocks
        Graphics                          : 1177 MHz
        SM                                : 1177 MHz
        Memory                            : 2505 MHz
        Video                             : 1083 MHz
    Max Customer Boost Clocks
        Graphics                          : N/A
    SM Clock Samples
        Duration                          : 386.49 sec
        Number of Samples                 : 29
        Max                               : 1177 MHz
        Min                               : 405 MHz
        Avg                               : 548 MHz
    Memory Clock Samples
        Duration                          : 386.49 sec
        Number of Samples                 : 29
        Max                               : 2505 MHz
        Min                               : 324 MHz
        Avg                               : 2157 MHz
    Clock Policy
        Auto Boost                        : Off
        Auto Boost Default                : Off
At the end of the output we can see that Auto Boost is set to “off” or “N/A” depending on the GPU. We can change this to “on” with the following command: sudo nvidia-smi --auto-boost-default=ENABLED -i 0. In case we want to set clocks to specific values we can do this with the following commands – first we make sure persistence mode is enabled and then we set Auto Boost or memory and SM clocks:
> sudo nvidia-smi -pm ENABLED -i 0
Enabled persistence mode for GPU 00000000:00:1E.0.
> # sudo nvidia-persistenced   # alternatively
> sudo nvidia-smi --auto-boost-default=ENABLED -i 0
All done.
# alternatively check for available clocks and set respectively
> nvidia-smi  -q -i 0 -d SUPPORTED_CLOCKS
........ Output ......
> sudo nvidia-smi --applications-clocks=2505,1177   # M60, depending on available clocks
Applications clocks set to "(MEM 2505, SM 1177)" for GPU 00000000:00:1E.0
> sudo nvidia-smi -ac 5001,1590                     # T4
Applications clocks set to "(MEM 5001, SM 1590)" for GPU 00000000:00:1E.0
Adapt the DCV image quality for best user experience
Background
Please note: most of the settings below apply to DCV TCP based connections. DCV QUIC/UDP offers great interactivity so please consider trying QUIC/UDP for your use cases as well: Configuration of QUIC/UDP for DCV Remote Desktops.
The format is (minimum_quality,maximum_quality). So in this case it would lower the maximum H264 quality from it’s default value of 80 to 70. You can also raise the lower boundary from 30 to a higher value which will result in a higher bandwidth consumption while providing better image quality in the H264 stream. This setting and the ones highlighted below typically work on TCP based connections.
Further optimization in case you are working in a high bandwidth environment and want to increase image quality testing effects in the following order on the DCV server (you need to reconnect to the session or restart the DCV server to pick up the settings):
display/quality
Increase the H264 stream quality by settingdisplay/qualityto e.g. (60, 80) or (80, 90). This will lead to an increase in bandwidth consumption so you can try (90,95) as well which will result in the highest quality and bandwidth consumption. Setting 100 will enforce lossless and significantly higher bandwidth. Or you can lower the quality boundaries in a low bandwidth environment. In the case of QUIC/UDP the protocol uses the available bandwidth and sets bitrate to quality fitting related to bandwidth. The TCP protocol estimates quality then sets the bandwidth (opposite of QUIC)
Windows:New-ItemProperty -Path "Microsoft.PowerShell.Core\Registry::\HKEY_USERS\S-1-5-18\Software\GSettings\com\nicesoftware\dcv\display" -Name quality -PropertyType STRING -Value "(80,90)" -Forcedisplay/enable-qu(enable quality update)
Default: true/1. Quality updates to be send after the screen becomes steady. Sends pixel-perfect copy of the remote screen. Disabling can be useful for certain workloads in case lossless is not needed. An example of when useful is e.g. remote gaming (screen is refreshing too fast for lossless to happen anyway).
Windows:New-ItemProperty -Path "Microsoft.PowerShell.Core\Registry::\HKEY_USERS\S-1-5-18\Software\GSettings\com\nicesoftware\dcv\display" -Name enable-qu -PropertyType DWORD -Value 0 -Forcedisplay/qu-bandwidth(quality update bandwidth)
Configure to use more bandwidth for the quality update by settingdisplay/qu-bandwidthto 10 (or 20). This will allow lossless to happen faster, the default being 2. Only active when quality updates are enableddisplay/frame-queue-weights
Default: (5,3,1). Tweak queue weights for low latency and high bandwidth by settingdisplay/frame-queue-weightsto (8,5,1). This is related to increase the number of active frames (DCV will send more frames before waiting for an ACK from the client). This applies to the TCP protocol.display/frames-in-transit
Control the min-max frames in transit, default is (2, 4). E.g. setdisplay/frames-in-transitto (2, 8). This applies to the TCP protocol.display/target-fps
Adapt the frame limiter by settingdisplay/target-fpsto 60 or even disable it by setting it to 0display/use-grabber-dirty-region
Default value: true/1. Specifies whether to use dirty screen regions. If enabled, the grabber tries to compute new frames out of the changed regions from the screen which is helpful in case of some desktop manager like XFCE. In essence, this setting optimizes the display by only sending the parts of the screen that have changed to the client, rather than full frame updates.
More settings related to the DCV display configuration and other paramters can be found here: https://docs.aws.amazon.com/dcv/latest/adminguide/config-param-ref.html#display
Please note the Reload context column in each table indicates when the parameter is reloaded. Possible contexts include:
server– The parameter is loaded once when the server is started. If the parameter value is updated, the new value is loaded when the server is restarted.session– The parameter is loaded when the session is created. If the parameter value is updated, the new value is loaded for subsequent sessions.connection– The parameter is loaded when a new client connection is established. If the parameter value is updated, the new value is used for subsequent client connections.custom– The conditions under which the parameter loads is unique to this parameter. See the parameter description for more information.
Linux
For fine-grained control, you can tune the 0-100 quality setting on the server side by modifying the /etc/dcv/dcv.conf file and adding a line to the display section:
[display]
quality=(70,90)
The format is (minimum_quality,maximum_quality). So in this case it would lower the maximum H264 quality from it’s default value of 80 to 70. You can also raise the lower boundary from 30 to a higher value which will result in a higher bandwidth consumption while providing better image quality in the H264 stream. This setting and the ones highlighted below typically work on TCP based connections.
Windows
On Windows it would be the respective parameter in HKEY_USERS\S-1-5-18\Software\GSettings\com\nicesoftware\dcv\display\quality were we can create a string entry with “(60,90)” in case we want to always have a higher quality in the H264 stream with a higher bandwidth consumption.
When a larger portion of the screen content changes DCV will use a H264 stream to display the changing content. When the image is steady a pixel-perfect quality update will be send with the exact copy of the server side image on the GPU. To disable the quality update we can set HKEY_USERS\S-1-5-18\Software\GSettings\com\nicesoftware\dcv\display\enable-qu to 0 on Windows (false on Linux).
Limiting the bandwidth usage
Linux
- Edit the file
/etc/dcv/dcv.conf - Look for the
[connectivity]section - Set, or add if is not there, the value needed. In this example 20000 means 20mbps.
max-target-bitrate=20000
Windows
- Open the registry key
HKEY_USERS\S-1-5-18\Software\GSettings\com\nicesoftware\dcv\connectivity\ - Create a new QWORD:
max-target-bitrate - Set 20000 if you want 20mbps max bandwidth usage, for example
Slow devices with QUIC / UDP transport protocol
If you have some device being slow, this can help you. Some Wacom Tablet devices can have problems with QUIC / UDP transport protocol.
The parameter that we will show below will instruct the server to use QUIC streams instead of QUIC datagram, which can help connections with high data packet loss problems.
You can also limit the max bandwidth usage, which can also help improve the user experience.
Linux DCV client
Try to open the client with this parameter:
./dcvviewer --dqt-alpn-versions="Dcv20Basic"Windows DCV Client
Try to open the client with this parameter:
.\dcvviewer.exe [...] --enabled-quic-alpn-versions="Dcv20Basic"Linux DCV server
Edit the /etc/dcv/dcv.conf file and set:
[display]
quality=(90,95)
# here you can try 100 as well but this will be lossless so more bandwidth
# to tune quic in the connectivity section:
[connectivity]
enable-datagrams-display = always-off
# set the quic target bitrate to 20Mbit/sec
max-target-bitrate=20000You can also try to use specific display encorders under [display] section.
Please test the first option before try the second option. Use the one that actually improve your user experience.
Option 1:
display-encoders=['ffmpeg', 'turbojpeg', 'lz4']Option 2:
display-encoders=['turbojpeg', 'lz4']Option 3:
display-encoders=['lz4']Windows DCV client
Try to open the client with this parameter:
dcvviewer.exe --enabled-quic-alpn-versions="Dcv20Basic"Large resolutions: 5120×1440, 2x 2560×1600 or 2x 3840×2160
Here are some parameters where you can use to start tweak the values to improve the user experience:
[session-management]
enable-gl-in-virtual-sessions = "default-off"

[display]
max-head-resolution = "(7680, 2160)"
qu-bandwidth=20
quality=(20,90)
frame-queue-weights=(8,5,1)
frames-in-transit=(2,8)

[connectivity]
web-port=8443
enable-quic-frontend=true
quic-port=8443
idle-timeout=0

[input]
enable-autorepeat=false
mouse-wheel-sensitivity=0
More details about display parameters click here.
STAR-CCM / STAR-CCM+ low framerate
Here is a checklist to verify the root cause of low framerate
- Check if you are using QUIC/UDP instead of WS/TCP protocol (check the Stream metrics in your DCV Viewer client). You must use QUIC/UDP for better UI experience.
- If you are using Linux, you need to check if
-gpgpuparameter is being used. It will add GPU acceleration and will improve a lot the performance. You can check your start script or, before after opening the project, select GPGPU option (not selected by default). - Check if star-ccm is loaded in your GPU memory with nvidia-smi command
Check in Tools > Options > Visualization > Refresh rateif the limit is greater than 1.0. In some setups we saw it being limited by 1.0. Please change to something higher, like 30 or more. A too higher value can reduce the performance, it depends of your GPU. You need to test the best value.- Check your STAR-CCM logs to see if there any error happening related with GPU or OpenGL.
- Try to export the below variables before starting STR-CCM to debug eventual OpenGL issues
export DCV_GL_LOG_LEVEL="DEBUG"
export DCV_GL_LOG_DIR="/tmp/dcvgl/ - Try to run
glxgearsor move thestar-ccmwindow around very fastly and check, at the same time, the Stream metrics to understand if you get high framerate for that and not for your 3d model. - If you are using XFCE, will be good to test if the same issue is happening under GNOME sessio with GDM as display manager.
QUIC Streams and Datagrams modes
If you are experience very high latencies and the default QUIC Datagrams mode is not providing the best experience for you, you can still try to use the QUIC Streams mode.
Summary
- QUIC Streams are used when reliability and ordered delivery are important. They’re similar to TCP but without head-of-line blocking issues and with better multiplexing capabilities.
- QUIC Datagrams are used for cases where speed and low latency are crucial, and some data loss is acceptable. They are more similar to traditional UDP.
QUIC Streams
- Reliable Transmission: QUIC streams provide a reliable transmission mechanism. Data sent over a QUIC stream is guaranteed to arrive at the destination without corruption and in the order it was sent, similar to TCP.
- Ordered Delivery: QUIC streams ensure that data is delivered in the order it was sent. This is crucial for certain types of data, like files or HTML documents, where order matters.
- Flow Control: Each stream in QUIC is flow-controlled independently. This means that a receiver can apply back-pressure on a per-stream basis, preventing a sender from overwhelming it with too much data.
- Multiplexing: Multiple streams can be multiplexed over a single QUIC connection. This allows for efficient use of the connection, reducing the overhead and latency associated with establishing multiple connections.
- Use Case: Ideal for scenarios where data integrity and order are critical, such as web page loading, file transfers, and API calls.
To have the Streams mode, you need to edit your dcv.conf and set:
[connectivity]
enable-quic-frontend=true
enable-datagrams-display = always-off
QUIC Datagrams
- Unreliable Transmission: QUIC datagrams provide an unreliable transmission mechanism. This means there’s no guarantee that data sent will arrive or that it will arrive in the order it was sent.
- Unordered Delivery: There is no inherent ordering in the delivery of datagrams. Each datagram is independent of the others.
- No Flow Control: Datagram transmission is not flow-controlled. This makes them suitable for use cases where it’s okay to lose some data, and it’s more important to minimize latency.
- Efficiency in Specific Scenarios: They are efficient for use cases where transmission speed is more critical than reliability, such as real-time video or audio streaming, gaming, or live broadcasting.
- Use Case: Ideal for scenarios where low latency is more important than reliable delivery, and the application can tolerate some degree of data loss.
To have the Streams mode, you need to edit your dcv.conf and set:
[connectivity]
enable-quic-frontend=true
DCV high bandwidth usage and stuttering
If you are seeing playback stuttering or eventual delays/pauses, and you are producing a huge DCV traffic for an user, is possible that you are reaching some resource limit that is causing performance issues in DCV protocol.
The most common limits are:
- CPU capacity: Specially if you are under Cloud environment where a lot of resources are being shared between instances.
- CPU/GPU performance: Your CPU/GPU does not has enough resources to produce the amount of traffic or framerate that you need to stream your remote desktop with good experience.
- IOPS guarantee: If your stream depends a lot of storage, probably you do not have IOPS enough to provide the stream content with good performance.
- Network degradation: If you are having network congestion, there is a high chance to be the root cause. Also, is common that some Clouds environment will not guarantee traffic quality after some limit, asking you to buy another network stack that is capable to produce more traffic with good performance.
Here is a checklist of stuffs that you can try to reduce or eliminate the issue when you are being limited by your infrastructure.
Tip 1 – Increase the resources
You need to identify and isolate the issue. And the first trial is about the resources. Try a much better Cloud for VM instance, specially with better CPU/GPU and network quality and check if the issue persists. Most of the time the issue is just about limited instance performance.
If you are using a Cloud instance, you can also try to run locally (premise server) and check if the issue persist.
Tip 2 – Try different encoders and codecs
Is possible that your are not using the best encoder for your case and as a consequence:
- Poor performane to encode the video frames
- Not efficient compression being applied, consuming more resources of bandwidth or CPU/GPU than usual
You can configure DCV Server to use these encoders supported by GPU:
display-encoders = ['nvenc', 'nvenc12', 'ffmpeg']Or by CPU:
display-encoders= ['ffmpeg', 'turbojpeg', 'lz4']And to use these possible codecs:
codecs = ['h264', 'jpeg', 'lz4']If you have a specific hardware that can accelerate the enconding process, like GPU NVIDIA cards, we recommend to use nvenc or nvenc12 (check your NVIDIA card specs) and AV or h264 codecs.
If you intend to use CPU to encode video frames, then you need to test which encoder and codec will offer the best performance according your current infrastructure.
Tip 3 – Try QUIC/UDP using streams or datagrams
Unless you have good reasons to use WS/TCP traffic to stream your remote desktop, ideally you need to use QUIC/UDP to reduce the network overhead (introduced by TCP protocol). With QUIC/UDP you can reach more performance with same hardware.
If you are already using QUIC/UDP, may you can try to test the STREAM and the DATAGRAM modes.
You can get more information clicking here.
Tip 4 – Monitoring the performance
You can enable the DCV metrics to help you understand how the resources are being used. You can find more clicking here.
If you are using GPU to encode, you can check nvidia-smi (NVIDIA) or rocm-smi (AMD) to understand if the DCV is being processed by the GPU and if the GPU is not too busy.
Tip 5 – Improve DCV compression efficiency
You can change some DCV parameters to improve the performance influencing in how the compression algorithm works.
- Increase the max compressor threads. The default value is 4.
[display]
max-compressor-threads=8 - Limit the maximum frame per second to avoid unnecessary bandwidth usage. Default value is -1, which means unlimited.
[display]
target-fps=30
Tip 6 – Control the image quality
Controlling the image quality you can reduce or increase the bandwidth usage and also the resources needed to compress and encode the video frames. You can get more details clicking here.
Tip 7 – Advanced DCV special parameters
Here are some parameters that can help you to improve DCV protocol for very specific cases.
Remember that these parameters are more advanced and usually the default ones are the best configuration.
In very specific cases, usually when you have excellent network quality (no packet loss, low latency and high bandwidth), you can reduce the DCV effort to be very efficient with network, allowing more bandwidth and higher framerates than usual.
Usually the QUIC/UDP protocol will provide the best experience for all cases, but when you have a very good network, the WS/TCP protocol allow DCV Server to have better control of the network congestion (due TCP design), reasing more bandwidth to be used.
enable-qu
“enable-qu” controls whether quality updates are sent during a DCV session. In remote display protocols, quality updates are typically messages that adjust the visual quality of the stream based on network conditions.
When enabled (default is “true”), the DCV client sends information to the server about the current connection quality, allowing the server to dynamically adjust parameters like:
- Image compression ratios
- Frame rates
- Color depth
This adaptive behavior would help maintain a responsive experience during varying network conditions, automatically balancing between visual quality and performance.
Disabling this setting would likely prevent these automatic adjustments, potentially resulting in either consistent but possibly suboptimal quality, or requiring manual quality adjustments instead.
If you have a good network (low latency, high bandwidth and almost no loss packets), may disabling “enable-qu” will influence the DCV protocol to use more bandwidth being less agressive with network efficiency.
To test, you can use the command below to set the parameters. You need to restart your session to apply the new parameters values.
dcv set-config --section display --key enable-qu "false"target-fps
Specifies the maximum allowed frames per second.
- A value of 0 means no limit.
- A value of -1 means that the target-fps value will be determined according to the server characteristics and the session type.
- With versions < 2020.2, the -1 value is not recognized and the default value is 25.
To test, you can use the command below to set the parameters. You need to restart your session to apply the new parameters values.
dcv set-config --section display --key target-fps "60"If you need 60 fps, then you need to set 60.
full-frame-threshold
This setting controls when your system switches between two different methods of encoding video:
- Full-frame encoding: Processes the entire screen at once
- Tile encoding: Only processes parts of the screen that have changed
The setting has two percentage values (Default value is (3,3)):
- First number: Used when encoding is done by software
- Second number: Used when hardware encoding is available
When the amount of screen that has changed is larger than these percentage values, the system uses full-frame encoding instead of tile encoding.
For example, with the default 3%:
- If less than 3% of the screen changed, it uses tile encoding (more efficient for small changes)
- If more than 3% of the screen changed, it switches to full-frame encoding
This helps optimize performance by using the most appropriate encoding method based on how much of the screen is changing.
To test, you can use the command below to set the parameters. You need to restart your session to apply the new parameters values.
dcv set-config --section display --key full-frame-threshold "(0,0)"If you have a good network (low latency, high bandwidth and almost no loss packets), (0,0) is a good value to start testing.
frames-in-transit / quic-frames-in-transit
“frames-in-transit” refers to the number of video frames that are actively being sent from the server to the client and are still in transit on the network. Adjusting this setting can impact the responsiveness and quality of the remote display.
Higher value: A higher number of frames in transit can improve responsiveness by allowing the server to send more data before waiting for confirmation, potentially leading to smoother and faster display updates.
Lower value: A lower value might result in a more responsive display but could lead to more frequent stalls if the network is congested, potentially resulting in a choppy display.
The default value is (2, 4) for WS/TCP and (12,16) for QUIC/UDP. You can start with (8,32) or (16,32) and test different combinations.
To test, you can use the command below to set the parameters. You need to restart your session to apply the new parameters values:
dcv set-config --section display --key frames-in-transit "(8,16)"
dcv set-config --section display --key quic-frames-in-transit "(32,48)"
Tip 8 – Test your network throughput and packet loss
Is essencial to check if you are having packet loss and how is the quality of your network after X time sending high bandwidth usage to your client. You can user iperf tool to do that and there is an example about how to do clicking here.
drop_rate messages
If you are seeing too much drop_rate messages for a specific user and if it continues printing for long periods or from time-to-time (frequency), it means that DCV is doing some effort to provide the best quality and experience, but due some resources restrictions, is possible that DCV will reduce the framerate to provide best responsiveness.
If you are not seeing too much messages, then you can consider them as normal. Some oscilation is expected, as you can not guarantee same network quality all the fime.
Some command issues that can cause this:
- Network or VPN issue (packet loss, bandwidth restriction etc).
- GPU is saturated, delaying the image encoding.
- Your link has not enough capacity to transfer your resolution in high quality.
You need to investigate what is happening with your network or server and isolate the problem.
We recommend to do:
- iperf tests, using TCP and UDP protocols, to understand if you are having bandwidth restriction, packet loss or if just DCV traffic is suffering of traffic shaping (due your internal network rules). Please read our iperf guide clicking here.
- Test if reducing your resolution to 50% or maintain the resolution, but reduce to 50% the image area that is being updated, while the other 50% is just a static image to DCV perspective (like half of the screen playing a video and the other half just a static background). If the messages stops and you get higher framerate, you probably are seeing network bandwidth limitations.
- Test the session without having anything else being executed in the CPU and GPU.
- Check the CPU and GPU usage during the tests.
NVIDIA limited sessions performance after some sessions created
If you are seeing a limited performance after some number of DCV Sessions being created, you need to check:
- The GPU and memory usage; Maybe you reached the GPU resources limit, mainly when you run another jobs in the GPU, together with DCV Sessions.
- The GRID license is installled; If not, you will see the message “Valid GRID license not found. GPU features and performance are restricted. To enable full functionality please configure licensing details.” from nvidia-gridd daemon.
For more details about NVIDIA license, click here.


