NICE DCV Product Codes and Features
Here you can find an overview of NICE DCV Product Codes and Features.
Any suggestions or questions reach out to us! Location of NICE DCV Logfiles
Connect to a specific DCV session
When running multiple DCV sessions on one server you can specify in the DCV client to which session you would like to connect to by adding “#session_name” – e.g. #session3 in the example below:
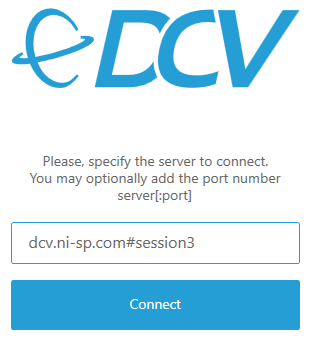
This also is possible in the DCV web client by specifying the session name in the URL like e.g. https://dcv.ni-sp.com#session3.
Adapting the DCV Web Client default resolution
The default maximum remote desktop resolution for the DCV WebClient is set to (1920, 1080). This can be adapted by setting the parameter “web-client-max-head-resolution“.
On a Windows DCV server you can set the registry key HKEY_USERS\S-1-5-18\Software\GSettings\com\nicesoftware\dcv\display\web-client-max-head-resolution to the desired maximum resolution.
Disable NICE DCV Authentication on Windows
To disable the NICE DCV authentication on Windows you can follow these steps:
- Open the Windows Registry Editor.
- Navigate to the
HKEY_USERS\S-1-5-18\Software\GSettings\com\nicesoftware\dcv\security\and select theauthenticationparameter. If there is no authentication parameter in the registry key, create one
a. In the left-hand pane, open the context (right-click) menu for the authentication key and choose New, string value.
b. For Name, type authentication and press Enter. - Open the authentication parameter. For Value data, enter either system or none.
- Choose OK and close the Windows Registry Editor.
- Restart the DCV Server
Enabling the Grip Bar in Full-Screen Mode
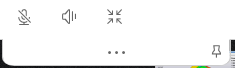
When you have enabled full-screen mode in the NICE DCV client you can move to the upper screen area to trigger showing the menu bar. In case this automatic behaviour does not fit your use case you can click the pin to the right of the dotted bar (“…”) and the grip bar is stuck. You can then also move it to the place where it works best for you. Screenshots are below with pin open in the first screenshot:

Locked grip bar after clicking the pin and moved to another location:
How to increase image quality forcing YUV444 or YUV420 lossless updates
In some cases high fidelity of images is needed like in movie editing where chroma artifacts introduced by the H264 stream can be an issue. In this case the colorspace can be changed for better image quality while increasing the network usage.
Force YUV444 colorspace for video content
Tradeoff: improve the overall quality, but increase the network usage.
To enable this on the Windows client there are two options:
- Launch the client from the command line and set the option –enable-yuv444-decoding=true, for example with the command:C:\WINDOWS\system32>”C:\Program Files (x86)\NICE\DCV\Client\bin\dcvviewer.exe” –enable-yuv444-decoding=true
- Set the EnableYUV444Decoding=true setting in the connection file [options] section. For example, add this configuration to the connection file:[options] EnableYUV444Decoding=true
It is not possible to set this option on the web client.
Force YUV colorspace for lossless updates
Tradeoff: reduce flickering, but lossless updates will not have the exact RGB values of the server source.
To enable this on the Windows client:
- Launch the client from the command line and set the option –enable-lossless-yuv-decoding=true, for example with the command:C:\WINDOWS\system32>”C:\Program Files (x86)\NICE\DCV\Client\bin\dcvviewer.exe” –enable-lossless-yuv-decoding=true
- Set the EnableLosslessYUVDecoding=true setting in the connection file [options] section. For example, add this configuration to the connection file:[options] EnableLosslessYUVDecoding=true
It is not possible to set this option on the web client.
Check supported display resolutions
On Windows, you can use the following command from a PowerShell terminal to get the list of supported resolutions:
PS C:\> foreach ($video in Get-WmiObject -Class CIM_VideoControllerResolution) { Write-Host $video }
....
\\EC2AMAZ-PDQBG1E\root\cimv2:CIM_VideoControllerResolution.SettingID="1920 x 1080 x 4294967296 colors @ 59 Hertz“
\\EC2AMAZ-PDQBG1E\root\cimv2:CIM_VideoControllerResolution.SettingID="1920 x 1200 x 4294967296 colors @ 59 Hertz“
\\EC2AMAZ-PDQBG1E\root\cimv2:CIM_VideoControllerResolution.SettingID="1920 x 1440 x 4294967296 colors @ 59 Hertz“
\\EC2AMAZ-PDQBG1E\root\cimv2:CIM_VideoControllerResolution.SettingID="2048 x 1536 x 4294967296 colors @ 59 Hertz“
\\EC2AMAZ-PDQBG1E\root\cimv2:CIM_VideoControllerResolution.SettingID="2560 x 1440 x 4294967296 colors @ 59 Hertz“
\\EC2AMAZ-PDQBG1E\root\cimv2:CIM_VideoControllerResolution.SettingID="2560 x 1600 x 4294967296 colors @ 59 Hertz“
\\EC2AMAZ-PDQBG1E\root\cimv2:CIM_VideoControllerResolution.SettingID="3840 x 2160 x 4294967296 colors @ 60 Hertz“
\\EC2AMAZ-PDQBG1E\root\cimv2:CIM_VideoControllerResolution.SettingID="4096 x 2160 x 4294967296 colors @ 60 Hertz“
Windows DCV session with different users as owners
DCV on Windows by default starts one session, this session has an “owner”.
The default owner proposed at installation time is Administrator, but you can change it, see:
By default, only the owner can connect to that session. If you want multiple users to be able to connect to the session, you have to change the DCV session permissions:
https://docs.aws.amazon.com/en_us/dcv/latest/adminguide/security-authorization.html
If for instance, you set a permission file that says that user1, user2 and user3 are authorized to connect, any of those users can connect to the session.
If instead you want that user1, user2, user3 can all start a session, but once the session is started only the same user that started the session can connect, then you need to use a session broker like EnginFrame/Neutro to dynamically manage sessions.
Embed inside an iFrame
DCV by default does not allow it to be embedded inside an iFrame to avoid Clickjacking attacks.
However there are use cases where we want to intentionally remove this limitation to allow us to use DCV inside another Web Application. This is controlled by two HTTP headers:
- https://www.owasp.org/index.php/Clickjacking_Defense_Cheat_Sheet#Defending_with_X-Frame-Options_Response_Headers
- https://www.owasp.org/index.php/Content_Security_Policy_Cheat_Sheet#Preventing_Clickjacking
To use DCV inside an iFrame you must change two settings:
- web-x-frame-options
- web-extra-http-headers
The first one sets the X-Frame-Options value, the allowed values are: “DENY”, “SAMEORIGIN” and “ALLOW-FROM <uri>”
The default is DENY. Chrome and Safari do not support the “ALLOW-FROM <uri>” value (https://bugs.chromium.org/p/chromium/issues/detail?id=129139) so in that case you must also set the second option to set the Content-Security-Policy header, for this you use the setting web-extra-http-headers, which allows to specify an array of extra headers to be added to the HTTP/HTTPS headers. The array should be filled with pairs like: [(‘header_name’,’header_content’)]. Multiple headers can be added. For instance, if the website answers to the address https://myportal.com and you want to stream DCV inside an iframe, you should use the following configuration:
Windows: HKEY_USERS\S-1-5-18\Software\GSettings\com\nicesoftware\dcv\connectivity

web-x-frame-options ALLOW-FROM https://myportal.com
web-extra-http-headers  [("Watchcloud", "Production Engine"), ("Content-Security-Policy", "frame-ancestors https://*.myportal.com https://myportal.com")]
Disable clipboard copy or paste for all users
To deny the clipboard usage for all users of all sessions you have to add these rows to the default permissions file (C:\Program Files\NICE\DCV\Server\conf\default.perm):
[permissions]
%any% deny clipboard-copy clipboard-paste
Disable screenshot
Regarding the screenshot feature we have “disable-screenshot” setting on the client side to disable it. For now we don’t have any feature server-side.
On the client side there are 2 ways to disable the screenshot feature:
- Launch the client with the –disable-screenshot command line parameter
- Create a dcv connection file and add the following
[options]
disablescreenshot=true
You have to add the --disable-screenshot parameter to dcvviewer.exe command line.
Associate .dcv file with portable DCV Viewer
We have two options. The first option is the easier one. You just run a .bat file that will execute a PowerShell script which will ask the user where is the dcvviewer.exe and then apply the association.
Please create a dcv.bat file with this content and then execute it.
@echo off
setlocal enabledelayedexpansion

:ask_path
:: Ask for the path to dcvviewer.exe
echo Please provide the full path to dcvviewer.exe:
set /p DCVVIEWER_PATH=

:: Check if the file exists
if not exist "%DCVVIEWER_PATH%" (
    echo The file does not exist. Please enter a valid path.
    goto ask_path
)

:: Escape backslashes in the path
set "ESCAPED_PATH=%DCVVIEWER_PATH:\=\\%"

:: Create the registry file content
(
echo Windows Registry Editor Version 5.00
echo.
echo [HKEY_CURRENT_USER\Software\Classes\dcv]
echo "URL Protocol"=""
echo @="URL:DCV Protocol"
echo [HKEY_CURRENT_USER\Software\Classes\dcv\DefaultIcon]
echo @="dcvviewer.exe,1"
echo [HKEY_CURRENT_USER\Software\Classes\dcv\shell]
echo [HKEY_CURRENT_USER\Software\Classes\dcv\shell\open]
echo [HKEY_CURRENT_USER\Software\Classes\dcv\shell\open\command]
echo @="%ESCAPED_PATH% %%1"
) > dcv_uri_register.reg

echo Registry file created as dcv_uri_register.reg

:: Ask if the user wants to install the registry file
set /p INSTALL_CHOICE=Do you want to install the registry file now? (Y/N):
if /i "%INSTALL_CHOICE%"=="Y" (
    regedit /s dcv_uri_register.reg
    echo Registry file installed.
) else (
    echo Installation skipped.
)

pause
The second option is using a Windows registry file. In this case you need to manually edit the path of DCV client, save and distribute. This is a good option if the dcvviewer.exe will be always in the same local. Create a dcv.reg file with this content:
Windows Registry Editor Version 5.00

[HKEY_CURRENT_USER\Software\Classes\dcv]
"URL Protocol"="\"\""
@="\"URL:DCV Protocol\""
[HKEY_CURRENT_USER\Software\Classes\dcv\DefaultIcon]
@="\"dcvviewer.exe,1\""
[HKEY_CURRENT_USER\Software\Classes\dcv\shell]
[HKEY_CURRENT_USER\Software\Classes\dcv\shell\open]
[HKEY_CURRENT_USER\Software\Classes\dcv\shell\open\command]
@="\"C:\\Users\\testuser\\Downloads\\nice-dcv-client-Release-portable\\nice-dcv-client-Release-portable-2024.0-9206\\bin\\dcvviewer.exe\" \"%1\""
Note: Replace the absolut path of dcvviewer.exe file and do not forget to use double slashes, like the example.
Save the file and then execute the dcv.reg file to setup the association.
Disable IDD after client disconnection
You can disable IDD driver after a client disconnection enabling the idd-unplug-on-client-disconnect parameter under display configuration in Windows.
"C:\Program Files\NICE\DCV\Server\bin\dcv.exe" set-config --section display/windows --key idd-unplug-on-client-disconnect trueNote: this setting is not compatible with the console-session-default-layout setting and will prevent the cli from applying a specified layout if no client is connected
Configure DCV to not disable Windows animations
By default DCV disable some Windows animations to improve the remote desktop session performance, but you still can stop this behavior executing this commands:
"C:\Program Files\NICE\DCV\Server\bin\dcv.exe" set-config --section windows --key disable-windows-animation false
"C:\Program Files\NICE\DCV\Server\bin\dcv.exe" set-config --section windows --key disable-drag-full-windows false
Then you need to recreate the session or restart DCV Server.
Configure the Layout Managers
Specifies the name of the layout managers to use. An empty list enables all
layout managers. Windows layout managers are [‘nvapi’, ‘virtualxddm’, ‘amd’, ‘dts’, ‘dod’, ‘winapi’, ‘idd’].
"C:\Program Files\NICE\DCV\Server\bin\dcv.exe" set-config --section display --key layout-managers "['nvapi', 'virtualxddm', 'amd', 'dts', 'dod', 'winapi', 'idd']"Configure the codecs
List of codecs enabled for video streaming. An empty list enables all the codecs
from the client, if they are supported. The codecs are [‘h264’, ‘mpeg1video’, ‘jpeg’, ‘lz4’].
"C:\Program Files\NICE\DCV\Server\bin\dcv.exe" set-config --section display --key codecs ['h264', 'mpeg1video', 'jpeg', 'lz4']Configure the display encoders
Specifies the name of the display encoders to use. An empty list enables all
display encoders. The display encoders are [‘nvenc’, ‘nvenc12’, ‘amd’, ‘amf’, ‘vaapi’, ‘ffmpeg’, ‘turbojpeg’, ‘lz4’].
"C:\Program Files\NICE\DCV\Server\bin\dcv.exe" set-config --section display --key display-encoders "['nvenc', 'nvenc12', 'amd', 'amf', 'vaapi', 'ffmpeg', 'turbojpeg', 'lz4']"Houdini with IDD driver
If you are having Houdini software crash with recent Windows updates, this is related with Windows regressions with IDD driver. You have two options:
- Disable IDD driver or
- Maintain IDD driver enabled and set in the houdini.env file:
HOUDINI_OCL_DEVICETYPE=GPU
HOUDINI_USE_HFS_OCL=0
The first variable listed ensures that the GPU is used for OpenCL functions.
The second variable tells Houdini not to load the built-in CPU OpenCL driver that is shipped with Houdini.
More info you can find clicking here.
Configure the max resolution
If you need to limit the console resolution, then you need to set the max-head-display resolution:
"C:\Program Files\NICE\DCV\Server\bin\dcv.exe" set-config --section display --key max-head-resolution "(4096, 2160)"


