Overview
NI SP EF Portal is a feature-rich and very versatile portal framework dedicated to VDI session and HPC job and data management. You can find more information here.
The DCV Session Manager is a set of software packages (broker and agent) and an application programming interface (API) that makes it easy for developers and independent software vendors (ISVs) to build front-end applications that create and manage the lifecycle of NICE DCV sessions. In addition to the information below this guide can be helpful: Getting started with managing NICE DCV sessions secured behind a NICE DCV Connection Gateway.
Automatic Installation of the DCV Session Manager Broker and Agent on RH8/CentOS 8 and Derivatives
We have created an automatic script for RH8/CentOS 8 and derivatives which guides you through the installation of the following DCV Session Manager components:
- NICE DCV (without GPU)
- DCV Session Manager Broker
- DCV Session Manager Agent
- DCV Session Manager Gateway
The script can be downloaded here: Automatic Installation of the DCV Session Manager Broker and Agent on RH8/CentOS 8 and Derivatives. If you need support for other operating systems the script can be easily adapted to install other binaries or we can help with – just let us know.
Manual Installation of the DCV Session Manager Broker and Agent on Linux
The installation overview below shows the broker installation on CentOS 8. Other OS are similar (more details can be found here). We install the DCV Session Manager Broker with the following steps downloading the respective DCV SM Broker package from https://download.nice-dcv.com/):
sudo rpm --import https://d1uj6qtbmh3dt5.cloudfront.net/NICE-GPG-KEY
sudo yum install -y dcv-session-manager-broker-el8.noarch.2024.0.rpm
sudo systemctl enable dcv-session-manager-broker
sudo systemctl start dcv-session-manager-broker
# we can check if the SM Broker started correctly with
journalctl -xe
# broker log files can be found in /var/log/dcv-session-manager-broker/DcvSmBroker.*
tail /var/log/dcv-session-manager-broker/DcvSmBroker.*
# The incoming ports 8445 (default) and 8448 should be open
sudo iptables-save
sudo firewall-cmd --zone=public --add-port=8445/tcp --permanent   # agent to broker port
sudo firewall-cmd --zone=public --add-port=8448/tcp --permanent   # client to broker port, adapted from default 8443 to 8448
sudo firewall-cmd --reload
sudo firewall-cmd --list-all | egrep "8445|8448"
sudo iptables-save
# copy the broker certificate
sudo cp /var/lib/dcvsmbroker/security/dcvsmbroker_ca.pem $HOME
Here is a sample DCV SM Broker configuration file located in /etc/dcv-session-manager-broker/session-manager-broker.properties (after changing the broker properties file please restart the broker with sudo systemctl restart dcv-session-manager-broker):
root # sudo cat /etc/dcv-session-manager-broker/session-manager-broker.properties
# session-manager-working-path = /tmp
enable-authorization-server = true
enable-authorization = true
enable-agent-authorization = true
enable-persistence = false
connect-session-token-duration-minutes = 60
delete-session-duration-seconds = 3600
# create-sessions-number-of-retries-on-failure = 2
# autorun-file-arguments-max-size = 50
# autorun-file-arguments-max-argument-length = 150
# broker-java-home =
client-to-broker-connector-https-port = 8448
client-to-broker-connector-bind-host = 0.0.0.0
# client-to-broker-connector-key-store-file = test_security/KeyStore.jks
# client-to-broker-connector-key-store-pass = dcvsm1
agent-to-broker-connector-https-port = 8445
agent-to-broker-connector-bind-host = 0.0.0.0
# agent-to-broker-connector-key-store-file = test_security/KeyStore.jks
# agent-to-broker-connector-key-store-pass = dcvsm1
enable-gateway = false
# gateway-to-broker-connector-https-port = 8447
# gateway-to-broker-connector-bind-host = 0.0.0.0
# gateway-to-broker-connector-key-store-file = test_security/KeyStore.jks
# gateway-to-broker-connector-key-store-pass = dcvsm1
# enable-tls-client-auth-gateway = true
# gateway-to-broker-connector-trust-store-file = test_security/TrustStore.jks
# gateway-to-broker-connector-trust-store-pass = dcvsm1
# Metrics
# metrics-fleet-name-dimension = default
enable-cloud-watch-metrics = false
# if cloud-watch-region is not provided, the region is taken from EC2 IMDS
# cloud-watch-region = us-east-1
session-manager-working-path = /var/lib/dcvsmbroker
After having configured and started the broker we can start the agent e.g. for testing on the same machine:
# Download the Session Manager Agent
wget https://d1uj6qtbmh3dt5.cloudfront.net/2023.0/SessionManagerAgents/nice-dcv-session-manager-agent-2023.0.675-1.el8.x86_64.rpm
sudo yum install -y nice-dcv-session-manager-agent-2023.0.675-1.el8.x86_64.rpm
sudo cp dcvsmbroker_ca.pem /etc/dcv-session-manager-agent/
# append the configuration to the agent.conf file; we disable strict TLS verification
cat << EOF | sudo tee --append /etc/dcv-session-manager-agent/agent.conf
broker_host = '$HOSTNAME'           # it could be the case that you need to remove the previous broker_host config to active this one
tls_strict = false
ca_file = '/etc/dcv-session-manager-agent/dcvsmbroker_ca.pem'
EOF
sudo systemctl enable dcv-session-manager-agent
sudo systemctl start dcv-session-manager-agent
# The logfiles will be at /var/log/dcv-session-manager-agent/agent.log by default where you can e.g. debug issues in case the DCV SM agent is not able to communicate with the SM broker
tail /var/log/dcv-session-manager-agent/agent.log
With DCV Session Manager agents running you can query the session broker to show the registered agents:
> sudo dcv-session-manager-broker describe-agent-clients           # this command might takes a moment to initialize
 Session manager agent clients
 [ {
   "active" : true,
   "id" : "daeaf3e8-a59f-445a-8194-9e65a8d7dddc",
   "softwareStatement" : "ewogICJpZCIgOiAiMzQxOTUzMmMtNWU3Yy00ZTdhLWI2MWUtZmFjODQ5NjJmYzc5IiwKICAiaXNzdWVkQXQiIDogMTU5OTQ5NTcwMi4wMDAwMDAwMDAsCiAgImNsaWVudE5hbWUiIDogIkRDViBTZXNzaW9uIE1hbmFnZXIgQWdlbnQiLAogICJjbGllbnRWZXJzaW9uIiA6ICIyMDIwLjIiCn0=",
   "name" : "dcv-sm-agent"
 } ]
EF Portal and DCV Session Manager Configuration
In case you use another scheduler than the DCV Session Manager to schedule VDI session on Windows and Linux you can skip this part.
To allow EF Portal to interact with DCV Session Manager, you need to register EF Portal as a Session Manager API client (EF is the sample client name here) which provides us with the client-id and password:
# dcv-session-manager-broker register-api-client --client-name EF
client-id: 5ee022b4-9307-4a08-bebb-0320c716cc9d
client-password: OGMzYTk5MDgtODNjNC00Y2U4LTg2ODEtZDFmMmZjMzRjMDk5
In the EF Portal installation configuration we need to enter the respective Session Manager information which is then stored in the file $EF_TOP/conf/plugins/dcvsm/clusters.props (permission 600) as example for Session Manager cluster dcvsm_cl1 with Session Manager host sm-host (we use the default port 8443 for client to broker communication, or in case we adapted it to 8448 we replace 8443 with 8448):
# cat $EF_TOP/conf/plugins/dcvsm/clusters.props
DCVSM_CLUSTER_dcvsm_cl1_AUTH_ID=5ee022b4-9307-4a08-bebb-0320c716cc9d   # example
DCVSM_CLUSTER_dcvsm_cl1_AUTH_PASSWORD=OGMzYTk5MDgtODNjNC00Y2U4LTg2ODEtZDFmMmZjMzRjMDk5 # example
DCVSM_CLUSTER_dcvsm_cl1_AUTH_ENDPOINT=https://sm-host:8443/oauth2/token
DCVSM_CLUSTER_dcvsm_cl1_SESSION_MANAGER_ENDPOINT=https://sm-host:8443
DCVSM_CLUSTER_dcvsm_cl1_NO_STRICT_TLS=true
where dcvsm_cl1 is the name of the Session Manager cluster as stored in $EF_TOP/conf/plugins/dcvsm/dcvsm.efconf:
DCVSM_CLUSTER_IDS=dcvsm_cl1Yoiu need also to enable dcvsm as a job manager editing the file $EF_TOP/conf/plugins/interactive/interactive.efconf
INTERACTIVE_DEFAULT_LINUX_JOBMANAGER=dcvsm
EF_DELEGATE_SESSION_MANAGERS=dcvsm
And edit the file $EF_TOP/conf/plugins/grid/grid.conf
EF_GRID_MANAGERS="dcvsm"Important: If you have slurm, you can set “dcvsm,slurm”; But if you do not have slurm installed (and configured), and you have in the grid.conf file, you need to remove slurm from there, otherwise EF Portal will try to lookup for slurm and give error.
Installing the DCV Session Manager CLI
The DCV Session Manager Command Line Interface (CLI) offers control and monitoring of DCV servers and sessions. The following commands are available:
root # ./dcvsm -h
  close-servers                Closes one or more NICE DCV servers.
  create-session               Creates a new NICE DCV session.
  delete-session               Deletes the specified NICE DCV session.
  describe-servers             Describes one or more NICE DCV servers.
  describe-sessions            Describes one or more NICE DCV sessions.
  get-session-connection-data  Gets connection data for a specific NICE DCV session.
  get-session-screenshots      Gets screenshots of one or more NICE DCV sessions.
  open-servers                 Opens one or more NICE DCV servers.
  update-session-permissions   Updates the user permissions for a specific NICE DCV session.
The installation steps for NICE DCV Session Manager are:
wget https://d1uj6qtbmh3dt5.cloudfront.net/2023.0/SessionManagerCLI/nice-dcv-session-manager-cli-1.0.3-132.zip
unzip nice-dcv-session-manager-cli-1.0.3-132.zip
cd nice-dcv-session-manager-cli-1.0.3-132/
sed -ie 's~/usr/bin/env python~/usr/bin/env python3~' dcvsm   # replace the python with the python3 binary
./dcvsm --version
> NICE DCV Session Manager CLI, version 1.0.3-132
In case we do not have registered a client yet we can register with the following command:
# dcv-session-manager-broker register-api-client --client-name EF
client-id: 5ee022b4-9307-4a08-bebb-0320c716cc9d
client-password: OGMzYTk5MDgtODNjNC00Y2U4LTg2ODEtZDFmMmZjMzRjMDk5
In the “conf” directory we can find the DCV SM CLI configuration file conf/dcvsmcli.conf which we can adapt with our settings similar to below replacing client id, password and other configuration parameters (we have set the client-to-broker port to 8448 to avoid possible conflict with the DCV default port 8443):
root # cat conf/dcvsmcli.conf
[output]
# The formatting style for command output.
output-format = json

# Turn on debug logging
# debug = true

[security]
# Disable SSL certificates verification.
no-verify-ssl = true

# CA certificate bundle to use when verifying SSL certificates.
# ca-bundle = conf/dcvsmbroker_ca.pem

[authentication]
# hostname of the authentication server used to request the token
auth-server-url = https://ip-172-31-4-230:8448/oauth2/token?grant_type=client_credentials

# The client ID
client-id = 5ee022b4-9307-4a08-bebb-0320c716cc9d

# The client password
client-password = OGMzYTk5MDgtODNjNC00Y2U4LTg2ODEtZDFmMmZjMzRjMDk5

[broker]
# hostname or IP of the broker. This parameter is mandatory.
url = https://ip-172-31-4-230:8448
Describe Servers with the DCV SM CLI
Now we can use the CLI to check our DCV SM Broker using the commands highlighted above. Here is e.g, a sample output of the dcvsm describe-servers command:
root# ./dcvsm describe-servers
{
    "request_id": "e026e7f3-731b-42ad-9cde-8cea6bec6214",
    "servers": [
        {
            "id": "aXAtMTcyLTMxLTQtMjMwLTE3Mi4zMS40LjIzMC0zNjczMTkyMDlhZTE0YjdiYTg5ZmZhYjg0Mzc0MGRiMg==",
            "ip": "172.31.4.230",
            "hostname": "ip-172-31-4-230",
            "default_dns_name": "ip-172-31-4-230.eu-central-1.compute.internal",
            "endpoints": [
                {
                    "ip_address": "0.0.0.0",
                    "port": 8443,
                    "web_url_path": "/",
                    "protocol": "HTTP"
                },
                {
                    "ip_address": "::",
                    "port": 8443,
                    "web_url_path": "/",
                    "protocol": "HTTP"
                }
            ],
            "version": "2023.0.15065",
            "session_manager_agent_version": "0.0.0",
            "availability": "AVAILABLE",
            "console_session_count": 0,
            "virtual_session_count": 0,
            "host": {
                "os": {
                    "family": "linux",
                    "name": "Ubuntu",
                    "version": "22.04",
                    "kernel_version": "5.19.0-1027-aws"
                },
                "memory": {
                    "total_bytes": 4135554048,
                    "used_bytes": 1415235584
                },
                "swap": {
                    "total_bytes": 0,
                    "used_bytes": 0
                },
                "aws": {
                    "region": "eu-central-1",
                    "ec2_instance_type": "t3.medium",
                    "ec2_instance_id": "i-0220928deaa3c42b6",
                    "ec2_image_id": "ami-02e301abe6e1a910f"
                },
                "cpu_info": {
                    "vendor": "GenuineIntel",
                    "model_name": "Intel(R) Xeon(R) Platinum 8259CL CPU @ 2.50GHz",
                    "architecture": "x86_64",
                    "number_of_cpus": 2,
                    "physical_cores_per_cpu": 1
                },
                "cpu_load_average": {
                    "one_minute": 0.15,
                    "five_minutes": 0.07,
                    "fifteen_minutes": 0.02
                },
                "gpus": [
                    {
                        "vendor": "Amazon.com, Inc.",
                        "model_name": "Device"
                    }
                ],
                "logged_in_users": [
                    {
                        "username": "ubuntu"
                    }
                ]
            },
            "tags": [
                {
                    "key": "dcv:max-virtual-sessions",
                    "value": "-1"
                },
                {
                    "key": "dcv:os-family",
                    "value": "linux"
                },
                {
                    "key": "dcv:max-concurrent-sessions-per-user",
                    "value": "1"
                }
            ]
        }
    ]
}
Creating, Listing and Deleting a session with the DCV SM CLI
Creating a session dynamically with the DCV SM CLI is also easy on one or more DCV servers:
ubuntu> ./dcvsm create-session --name SESS1 --owner ubuntu --type Virtual
{
    "request_id": "1ac796c2-82ab-4fd1-b11f-c4fa45a9fff7",
    "successful_list": [
        {
            "id": "3715ea87-c0f0-490f-9f4c-8c24cc9a4d82",
            "name": "SESS1",
            "owner": "ubuntu",
            "type": "Virtual",
            "state": "CREATING",
            "substate": "SESSION_PLACING"
        }
    ],
    "unsuccessful_list": []
}
# Create a DCV Console session on a specific host:
ubuntu> ./dcvsm create-session --name session123 --owner sessionOwner --type Console --requirements "server:Hostname=’mycoolworkstation’"
# Create a DCV Console session on a Windows server:
ubuntu> ./dcvsm create-session --name session123 --owner sessionOwner --type Console --requirements "server:Host.Os.Family = 'windows'"
ubuntu> ./dcvsm describe-sessions
{
    "request_id": "e5f73683-13a7-4362-bb44-c6182a3488b3",
    "sessions": [
        {
            "id": "3715ea87-c0f0-490f-9f4c-8c24cc9a4d82",
            "name": "SESS1",
            "owner": "ubuntu",
            "server": {
                "id": "aXAtMTcyLTMxLTQtMjMwLTE3Mi4zMS40LjIzMC0zNjczMTkyMDlhZTE0YjdiYTg5ZmZhYjg0Mzc0MGRiMg==",
                "ip": "172.31.4.230",
                "hostname": "ip-172-31-4-230",
                "default_dns_name": "ip-172-31-4-230.eu-central-1.compute.internal",
                "port": "8443",
                "endpoints": [
                    {
                        "ip_address": "0.0.0.0",
                        "port": 8443,
                        "web_url_path": "/",
                        "protocol": "HTTP"
                    },
                    {
                        "ip_address": "::",
                        "port": 8443,
                        "web_url_path": "/",
                        "protocol": "HTTP"
                    }
                ],
                "web_url_path": "/",
                "version": "2023.0.15065",
                "session_manager_agent_version": "0.0.0",
                "availability": "AVAILABLE",
                "console_session_count": 0,
                "virtual_session_count": 1,
                "tags": [
                    {
                        "key": "dcv:os-family",
                        "value": "linux"
                    },
                    {
                        "key": "dcv:max-concurrent-sessions-per-user",
                        "value": "1"
                    },
                    {
                        "key": "dcv:max-virtual-sessions",
                        "value": "-1"
                    }
                ]
            },
            "type": "VIRTUAL",
            "state": "READY",
            "creation_time": "2023-07-03T13:16:37.609000+00:00",
            "num_of_connections": 0,
            "storage_root": ""
        }
    ]
}
ubuntu> ./dcvsm  delete-session --session-id 3715ea87-c0f0-490f-9f4c-8c24cc9a4d82 --owner ubuntu
{
    "request_id": "0305c131-5378-42ff-a3aa-0f52c4b3ee81",
    "successful_list": [
        {
            "session_id": "3715ea87-c0f0-490f-9f4c-8c24cc9a4d82",
            "state": "DELETING"
        }
    ],
    "unsuccessful_list": []
}
Other commands to control the DCV environment are e.g. commands to open and close servers.
Using the DCV Session Manager Broker as DCV Authentication Server
To configure the authentication server for DCV so e.g. the user does not have to type the password after requesting a session in EnginFrame Views session management, we can set the following registry settings on Windows (set the pem certificate file, specify the URL to communicate with the Broker, for the port we use the Agent-Broker port with default 8445 and configure not to use strict TLS as the broker certificate is self-signed):
New-ItemProperty -Path "Microsoft.PowerShell.Core\Registry::HKEY_USERS\S-1-5-18\Software\GSettings\com\nicesoftware\dcv\security"  -Name ca-file -PropertyType STRING -Value "C:\Program Files\NICE\DCVSessionManagerAgent\conf\dcvsmbroker_ca.pem" -Force
New-ItemProperty -Path "Microsoft.PowerShell.Core\Registry::HKEY_USERS\S-1-5-18\Software\GSettings\com\nicesoftware\dcv\security"  -Name auth-token-verifier -PropertyType STRING -Value "https://broker_ip_or_dns:8445/agent/validate-authentication-token" -Force
New-ItemProperty -Path "Microsoft.PowerShell.Core\Registry::HKEY_USERS\S-1-5-18\Software\GSettings\com\nicesoftware\dcv\security"  -Name no-tls-strict -PropertyType DWORD -Value 1 -Force
The DCV Session Manager is integrated with the EnginFrame Views Session Management Portal. Any questions just let us know.
Installing the DCV Session Manager Agent on Windows
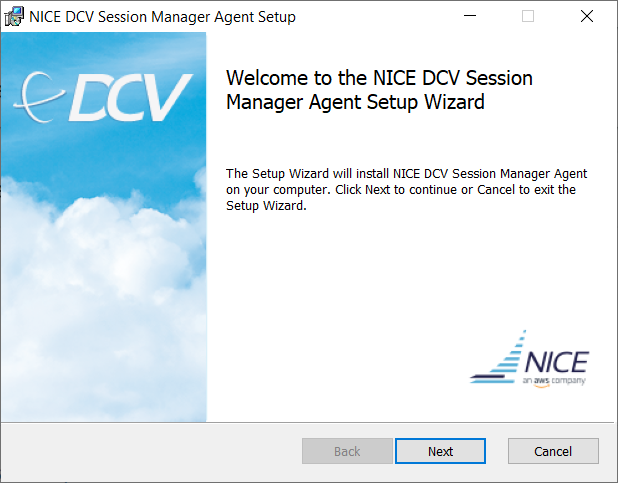
The DCV SM agent packages can be found at https://download.nice-dcv.com/ in the agent section. Executing the MSI installer guides through the installation process:
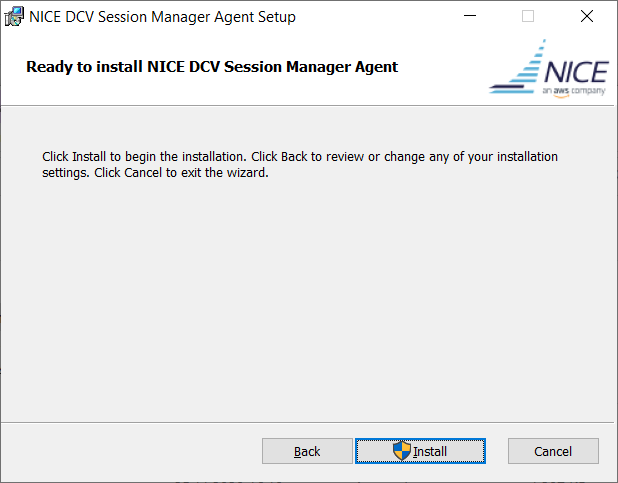
Then accept the EULA and proceed to:
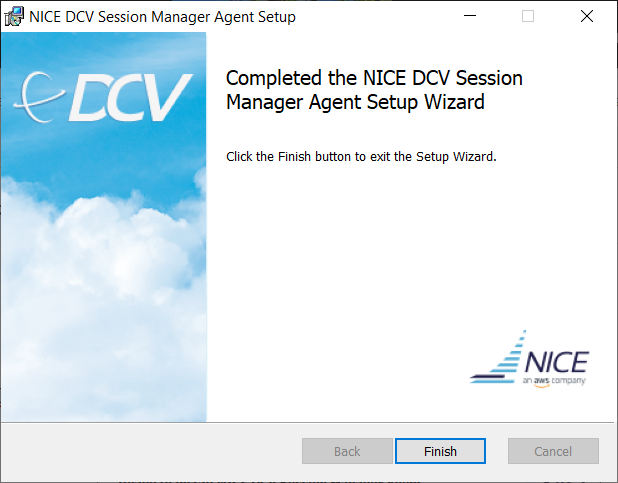
and the installation is finished:
Copy the dcvsmbroker_ca.pem certificate from the SM broker host to C:\Program Files\NICE\DCVSessionManagerAgent\conf\dcvsmbroker_ca.pem and adapt the C:\Program Files\NICE\DCVSessionManagerAgent\conf\agent.conf similar to the following configuration as admin user adapting the broker host and CA file according to your setup:
# ......
# hostname or IP of the broker. This parameter is mandatory.
broker_host = 'centos8'
# CA used to validate the certificate of the broker.
ca_file = 'C:\Program Files\NICE\DCVSessionManagerAgent\conf\dcvsmbroker_ca.pem'
tls_strict = 'false'
# ......
Open a Windows command shell (cmd) as Admin user and execute the following commands to reread the configuration:
sc stop DcvSessionManagerAgentService
sc start DcvSessionManagerAgentService
REM In case of Powershell:
REM Stop-Service -Name "DcvSessionManagerAgentService"
REM Start-Service -Name "DcvSessionManagerAgentService"
To inspect the logfiles we can have a look at the files in C:\ProgramData\NICE\DcvSessionManagerAgent\log per default. If the agent can connect to the broker on port 8445 by default you should see an output in agent.log similar to this (in case you have turned on debugging):
2020-11-27 13:53:35,429060 DEBUG ThreadId(11) dcvsessionmanageragent::dcv::cli:Executing command Command { std: "C:\\Program Files\\NICE\\DCV\\Server\\bin\\dcv" "list-endpoints", kill_on_drop: false }
2020-11-27 13:53:35,482422 DEBUG ThreadId(11) dcvsessionmanageragent::dcv::cli:Endpoints: EndpointList { endpoints: [Endpoint { ip: None, hostname: None, port: Some(8443), web_url_path: Some("/"), protocol: Some("http") }] }
2020-11-27 13:53:35,484032 DEBUG ThreadId(11) dcvsessionmanageragent::utils:Network interface: Ifv4Addr { ip: 192.168.178.116, netmask: 255.255.255.0, broadcast: Some(192.168.178.255) }
2020-11-27 13:53:35,484075 DEBUG ThreadId(11) dcvsessionmanageragent::dcv::cli:Executing command Command { std: "C:\\Program Files\\NICE\\DCV\\Server\\bin\\dcv" "list-sessions" "--json", kill_on_drop: false }
2020-11-27 13:53:35,527578 DEBUG ThreadId(11) dcvsessionmanageragent::dcv::cli:Session List SessionList { sessions: [Session { id: "console", name: None, owner: "Administrator", x11_display: None, x11_authority: None, num_of_connections: 1, creation_time: Some("1606483351000"), last_disconnection_time: Some("1606483443000"), licensing_mode: Some("demo"), licenses: Some([License { product: "dcv", status: "licensed", check_timestamp: Some("1606485151000") }]), display_layout: Some([DisplayLayout { width: 1920, height: 1080, x: 0, y: 0 }]), storage_root: Some(""), session_type: Some("CONSOLE") }] }
2020-11-27 13:53:35,527862 DEBUG ThreadId(11) dcvsessionmanageragent::tags:Failed to read tags from directory: Cannot find path. (os error 3)
2020-11-27 13:53:35,572258  INFO ThreadId(11) dcvsessionmanageragent::agent:Processing broker message "{\n  \"sessionsUpdateResponse\" : {\n    \"requestId\" : \"bcd3403041fb425cabc868308cf81441\",\n    \"result\" : {\n      \"success\" : true\n    }\n  }\n}"
2020-11-27 13:53:35,572299  INFO ThreadId(11) dcvsessionmanageragent::agent:Received sessions update response
With tags you can categorize your agents and DCV servers. Configure the tagfolder in the agent.conf file e.g. like this:
tags_folder = 'C:\Program Files\NICE\DCVSessionManagerAgent\conf\tags'and create a file tags.txt in that directory configuring the tags with e.g. the content:
gpu = "G4"
dcv_version = "2023.0"
disk = "500"
EF Portal Installation Script
You can execute the script at once (download EF Portal Installation Script) or step by step to monitor the execution of the single steps:
################################################################################
# Copyright (C) 2019-2024 NI SP GmbH
# All Rights Reserved
#
# info@ni-sp.com / www.ni-sp.com
#
# We provide the information on an as is basis.
# We provide no warranties, express or implied, related to the
# accuracy, completeness, timeliness, useability, and/or merchantability
# of the data and are not liable for any loss, damage, claim, liability,
# expense, or penalty, or for any direct, indirect, special, secondary,
# incidental, consequential, or exemplary damages or lost profit
# deriving from the use or misuse of this information.
################################################################################
# Version v1.2
#
# Script to perform the automatic installation of NICE EF Portal on Redhat/CentOS servers and SLURM cluster
# Targets a single node installation

# check if running on RH/CentOS
rhce="`hostnamectl | grep Operating | egrep -i 'centos|redhat'`"

if [ "$rhce" == "" ] ; then
    echo Exiting as only Redhat/CentOS are supported by this script at the moment
    exit
fi

echo
echo Checking for latest EF Portal version
echo
efdownload="https://www.ni-sp.com/wp-content/uploads/2019/10/efportal-2024.0-latest.jar"

echo "We will be downloading EF Portal from $efdownload ..."
# download EF
# -nv
wget  $efdownload

# sudo yum install java
sudo yum install jre
sudo adduser efnobody

# ######
# sudo adduser dcvtest
# sudo passwd dcvtest

EFADMIN=efadmin
echo "Creating user $EFADMIN (EF admin user)"
# if you prefer another user please adapt the config below
sudo useradd $EFADMIN
# sudo passwd $EFADMIN

# sudo java -jar efportal-202*-r*.jar

# find JRE
JREVAR=""
if [ -h /etc/alternatives/jre ] ; then
    JREVAR=/etc/alternatives/jre
else
    JREVAR=`ls /usr/lib/jvm/jre* |head -1 | sed -e 's/://'`
fi

# check for absolute license file path
if [ -f license.ef ] ; then
  LICENSEF="`/bin/pwd`"/license.ef
  echo Using license $LICENSEF
else
  echo "Could not find EF Portal license file license.ef in local directory ... exiting"
  exit
fi

cat > efinstall.config << EOF
######################################################################
# EF Portal
#
# This file has been automaticaly generated on Sat Nov 28 22:50:50 EST 2020
######################################################################

efinstall.config.version = 1.0


######################################################################
# License Agreement
# Review the license terms before installing EF Portal
######################################################################

# Setting the property ef.accept.eula to 'true' you declare that you have read
# you have read all the terms of the EF Portal
# license agreement and that you accept them.
#
# Values: [true|false]
ef.accept.eula = true


######################################################################
# What's new in EF Portal 2024.0
######################################################################


######################################################################
# License File
# Install the license file
######################################################################

# License file
# kernel.eflicense = /root/license.ef
kernel.eflicense = $LICENSEF


######################################################################
# Choose Install Location
# Choose the directory in which to install EF Portal
######################################################################

# Install directory
nice.root.dir.ui = /opt/nice


######################################################################
# EF Portal Update
# Preliminary Checks
######################################################################

######################################################################
# Java Runtime Environment (JRE) Selection
# Define which JRE will be used by EF Portal
######################################################################

# JRE base directory
# kernel.java.home = /usr/lib/jvm/java-1.8.0-openjdk-1.8.0.272.b10-1.el8_2.x86_64/jre
kernel.java.home = $JREVAR


######################################################################
# EF Portal Spoolers
# Choose the location for the EF Portal spoolers
######################################################################

# Spoolers directory
ef.spooler.dir = /opt/nice/enginframe/spoolers


######################################################################
# EF Portal Repository
# Choose the location for the EF Portal repository
######################################################################

# Repositories directory
ef.repository.dir = /opt/nice/enginframe/repository


######################################################################
# EF Portal Sessions
# Choose the location for the EF Portal sessions
######################################################################

# Sessions directory
ef.sessions.dir = /opt/nice/enginframe/sessions


######################################################################
# EF Portal Data
# Choose the location for the EF Portal data directory
######################################################################

# Data directory
ef.data.root.dir = /opt/nice/enginframe/data


######################################################################
# EF Portal Logs and Temp
# Choose the location for the EF Portal logs and temp directories
######################################################################

# Logs directory
ef.logs.root.dir = /opt/nice/enginframe/logs

# Temp directory
ef.temp.root.dir = /opt/nice/enginframe/tmp


######################################################################
# EF Portal configuration
# Choose the EF Portal configuration
######################################################################

# Choose the EF Portal configuration:
# Values: [PRO|ENT]
#ef.product = HPC PRO


######################################################################
# EF Portal Agent
# Choose if EF Portal Agent will run on this machine
######################################################################

# EF Agent will be started on this machine
# Values: [true|false]
kernel.agent.on.same.machine = true


######################################################################
# Agent Configuration
# Configure the EF Portal agent communication
######################################################################

# TCP port on which the RMI registry listens for requests
kernel.agent.rmi.port = 9999

# TCP port on which the EF Portal agent listens for RMI requests from the EF Portal server
kernel.agent.rmi.bind.port = 9998


######################################################################
# Agent Configuration
# Configure the EF Portal agent communication
######################################################################

# Hostname where the agent will be launched
#kernel.agent.host =

# TCP port on which the RMI registry listens for requests
#kernel.agent.rmi.port = 9999

# TCP port on which the EF Portal agent listens for RMI requests from the EF Portal server
#kernel.agent.rmi.bind.port = 9998


######################################################################
# EF P ortalAdministrator
# Specify the EF Portal administrator
######################################################################

# EF Portal administrator
kernel.ef.admin.user = efadmin


######################################################################
# Apache Tomcat HTTPS
# Enable Apache Tomcat HTTPS
######################################################################

# Apache Tomcat with HTTPS
# Values: [true|false]
kernel.server.tomcat.https = false


######################################################################
# Apache Tomcat Configuration
# Configure Apache Tomcat
######################################################################

# OS user owning the Apache Tomcat process
kernel.ef.tomcat.user = efnobody

# Context of the EF Portal web application
kernel.ef.root.context = enginframe

# TCP port on which Apache Tomcat listens for HTTP connections
kernel.tomcat.port = 8080

# TCP port on which Apache Tomcat listens for shutdown requests
kernel.tomcat.shutdown.port = 8005


######################################################################
# Apache Tomcat Configuration
# Configure Apache Tomcat
######################################################################

# OS user owning the Apache Tomcat process
#kernel.ef.tomcat.user = efnobody

# Context of the EF Portal web application
#kernel.ef.root.context = enginframe

# TCP port on which Apache Tomcat listens for HTTPS connections
#kernel.tomcat.https.port = 8443

# TCP port on which Apache Tomcat listens for shutdown requests
#kernel.tomcat.shutdown.port = 8005

# Hostname to be set into the autogenerated certificate for Apache Tomcat
#kernel.server.tomcat.https.ef.hostname = cent8


######################################################################
# EF Portal Database Configuration
# Configure EF Portal Database
######################################################################

# Select database to use
# Values: [derby|other-db]
kernel.ef.db = derby


######################################################################
# EF Portal Database Configuration
# Configure EF Portal Database
######################################################################

# DerbyDB port
kernel.ef.derby.db.port = 1527


######################################################################
# EF Portal Database Configuration
# Configure EF Portal  Database
######################################################################

# JDBC URL
#kernel.ef.db.url = jdbc\:derby\://localhost\:1527/EnginFrameDB

# Username
#kernel.ef.db.admin.name = dbadmin

# Property hidden PasswordTextInput
#kernel.ef.db.admin.password = XXXXXXXX


######################################################################
# Enterprise Configuration
# Configure Enterprise features
######################################################################

# Comma separated list of server IPs and ports e.g. 192.168.0.1:7800,192.168.0.2:7800
#kernel.ef.enterprise.tcp.servers =


######################################################################
# EF Portal Startup
# Choose whether EF Portal should start at boot
######################################################################

# Start EF Portal at boot
# Values: [true|false]
kernel.start_enginframe_at_boot = true


######################################################################
# EF  PortalStartup
# Select the version to start
######################################################################

# Use the new version?
# Values: [true|false]
#kernel.update_current_version = true


######################################################################
# EF Portal Developer's Documentation
# Choose whether to install the technical showcase and documentation
######################################################################

# Do you want to install the EF Portal Developer's Documentation?
# Values: [true|false]
demo.install = false


######################################################################
# Authentication Manager
# Select the default authentication manager
######################################################################

#
# Values: [pam|http|ldap|activedirectory|certificate]
default.auth.mgr = pam


######################################################################
# EF Portal Certificate Authority Configuration
# Configure EF Portal Certificate Authority
######################################################################

# Get username from client certificate
# Values: [true|false]
#kernel.authorization.certificate.userCertificate = false


######################################################################
# Authentication Manager Configuration
# Specify the PAM service
######################################################################

# PAM service
pam.service = system-auth


######################################################################
# Authentication Manager Configuration
# Test the PAM authentication manager
######################################################################

# Username
pam.user = dcvtest

# Property hidden PasswordTextInput
#pam.userpw = XXXXXXXX


######################################################################
# Authentication Manager Configuration
# Specify the 'ldapsearch' location
######################################################################

# Location of 'ldapsearch'
#ldap.ldapsearch = /usr/bin/ldapsearch


######################################################################
# Authentication Manager Configuration
# Specify the information needed to query the LDAP server
######################################################################

# Name of the host on which the LDAP server is located
#ldap.server =

# TCP port on which the LDAP server listens for requests
#ldap.port = 389

# Does the LDAP server require a secure connection (TLS)?
# Values: [true|false]
#ldap.secure = false

# Use simple authentication (instead of SASL)
# Values: [true|false]
#ldap.simple.auth = true

# Default base Distinguished Name (example: 'ou=People,dc=nice')
#ldap.base =


######################################################################
# LDAP Plug-in Configuration
# Specify username and password to test authentication
######################################################################

# Username
#ldap.user =

# Property hidden PasswordTextInput
#ldap.userpw = XXXXXXXX


######################################################################
# Authentication Manager Configuration
# Specify the 'ldapsearch' location
######################################################################

# Location of 'ldapsearch'
#activedirectory.ldapsearch = /usr/bin/ldapsearch


######################################################################
# Authentication Manager Configuration
# Specify the information needed to query the ActiveDirectory server
######################################################################

# Name of the host on which the ActiveDirectory server is located
#activedirectory.server =

# TCP port on which the ActiveDirectory server listens for requests
#activedirectory.port = 389

# Does the ActiveDirectory server require a secure connection (TLS)?
# Values: [true|false]
#activedirectory.secure = false

# Default base Distinguished Name
#activedirectory.base =


######################################################################
# ActiveDirectory Plug-in Configuration
# Specify username and password to test authentication
######################################################################

# Bind as
#activedirectory.bindas =

# Property hidden PasswordTextInput
#activedirectory.bindpwd = XXXXXXXX

# Username
#activedirectory.user =

# Property hidden PasswordTextInput
#activedirectory.userpw = XXXXXXXX


######################################################################
# Grid Manager
# Select the grid managers
######################################################################

#
ef.jobmanager = slurm


######################################################################
# LSF/OpenLava Integration
# Configure EF Portal to integrate with LSF/OpenLava
######################################################################

# Shell profile file
#lsf.profile.file = /opt/lsf/conf/profile.lsf


######################################################################
# LSF/OpenLava Integration
# Configure EF Portal to integrate with LSF/OpenLava
######################################################################

# Shell profile file
#lsf.profile.file = /opt/lsf/conf/profile.lsf


######################################################################
# PBS Integration
# Configure EF Portal to integrate with PBS
######################################################################

# PBS binaries path
#pbs.binaries.path = /usr/pbs/bin


######################################################################
# Torque Integration
# Configure EF Portal to integrate with Torque
######################################################################

# Torque binaries path
#torque.binaries.path = /usr/torque/bin


######################################################################
# Grid Engine Integration
# Configure EF Portal to integrate with Grid Engine
######################################################################

# Grid Engine shell profile file
#sge.profile.file = /opt/sge/default/common/settings.sh


######################################################################
# SLURM Integration
# Configure EF Portal to integrate with SLURM
######################################################################

# SLURM binaries path
slurm.binaries.path = /usr/bin


######################################################################
# AWS Batch Integration
# Configure EF Portal to integrate with AWS Batch
######################################################################

# AWS ParallelCluster name
#awsbatch.cluster = batch

# AWS ParallelCluster region
#awsbatch.region = us-east-1


######################################################################
# NEUTRO Plug-in
# Configuration of NEUTRO connection
######################################################################

# NEUTRO Master Address(es)
#neutro.neutro.master = localhost


######################################################################
# Delegate Interactive Session Manager
# Select the delegate interactive session managers
######################################################################

# DCV Session Manager
# Values: [true|false]
ef.delegate.dcvsm = true


######################################################################
# DCVSessionManager
# Configure DCV Session Manager connection
######################################################################

# OAuth2 Server URL
dcvsm.oauth2.url = https\://cent8\:8445/oauth2/token

# OAuth2 Client ID
dcvsm.oauth2.id = 4f25ac78-92b6-4f5e-9fdf-864f3f47dfa6

# Property hidden PasswordTextInput
#dcvsm.oauth2.psw = XXXXXXXX

# DCV Session Manager Broker URI
dcvsm.broker.url = https\://cent8\:8445/


######################################################################
# DCVSessionManager
# Configure DCV Session Manager connection
######################################################################

# Disable TLS Strict Check
# Values: [true|false]
dcvsm.no.strict.tls = true


######################################################################
# Do not modify any configuration below this line
######################################################################


intro-targets = component_enginframe,component_kernel,component_applets,component_parser,component_http,component_pam,component_ldap,component_activedirectory,component_rss,component_lsf,component_pbs,component_torque,component_sge,component_slurm,component_awsbatch,component_dcvsm,component_demo,component_neutro,component_vdi,component_applications,component_service-manager,component_user-group-manager,component_enginframe_finalizer,

progress-targets = cleanuptarget,
EOF

sudo java -jar efportal-202*.jar --batch -f efinstall.config

echo "=================================="
echo Finished installing EF Portal ...
echo "=================================="
sleep 3

cd /opt/nice/enginframe/bin
./enginframe start

# /opt/nice/enginframe/2024.0-r1785/enginframe/plugins/interactive/lib/remote

sudo iptables-save
sudo firewall-cmd --zone=public --add-port=8080/tcp --permanent
sudo firewall-cmd --zone=public --add-port=443/tcp --permanent
sudo firewall-cmd --reload
sudo firewall-cmd --list-all
sudo iptables-save | egrep "8080|443"

echo
echo
echo Now EF Portal should be up and running ...
echo You can connect with your browser at `hostname`:8080
echo
echo We exit here ... "(have a look at the script below to see how to e.g. enable SSL for EF Portal)"
echo
echo

exit

# covered by DCV
# yum install tigervnc-server
# vncserver

# install WM
# sudo yum install xfwm4 -y

echo Login as EF Admin and publish the interactive services in the Views portal

# X is running
# export XAUTHORITY=/run/user/42/gdm/Xauthority; export DISPLAY=:0
# xhost +
systemctl start dcvserver
dcv create-session --owner dcvtest t2


# https://support.nice-software.com/support/solutions/articles/1000053839-enginframe-https-with-httpd
# enable HTTPS for EF
yum install httpd mod_ssl -y

cat >  /etc/httpd/conf.d/httpd-enginframe.conf  << EOF
<Location "/enginframe">
  ProxyPass ajp://127.0.0.1:8009/enginframe flushpackets=on
</Location>
EOF

export EF_CONF_ROOT="/opt/nice/enginframe/conf"
# uncomment AJP section in $EF_CONF_ROOT/tomcat/conf/server.xml to look like this:
#  <Connector port="8009"
#    enableLookups="false"
#    redirectPort="8443"
#    protocol="AJP/1.3"
#    tomcatAuthentication="false"
#    />
vim  $EF_CONF_ROOT/tomcat/conf/server.xml

cat >> $EF_CONF_ROOT/enginframe/agent.conf << EOF
   ef.download.server.url=http://127.0.0.1:8080/enginframe/download
EOF

systemctl enable httpd.service

export EF_TOP="/opt/nice/enginframe"
 $EF_TOP/bin/enginframe stop
 service httpd stop
sleep 6
 $EF_TOP/bin/enginframe start
 service httpd start

###################################################################
###################################################################
# startup script to adapt IPs

localIP="`hostname -s`"

# adapt SLURM.conf

if [ "`grep $localIP /etc/slurm/slurm.conf | head -1`" == "" ] ; then

    cat /etc/slurm/slurm.conf | gawk  -v LIP=$localIP '
   { # gensub(regexp, replacement, how [, target]) #
       b = gensub (/ip-[0-9\\-]*/, LIP, "g");
       print b;
   }
' > SLURM.conf.TMP
    sudo mv SLURM.conf.TMP /etc/slurm/slurm.conf

    sudo service slurmd stop
    sudo service slurmctld stop
    sleep 3
    sudo service slurmctld start
    sudo service slurmd start
fi

# exit


extip=`curl --silent ifconfig.me`

if [ "`grep $localIP /opt/nice/enginframe/conf/plugins/interactive/nat.conf`" == "" ] ; then
   echo $localIP $extip >> /opt/nice/enginframe/conf/plugins/interactive/nat.conf
   exit
fi

# config extip in nat.conf
cat /opt/nice/enginframe/conf/plugins/interactive/nat.conf | gawk -v IP=$extip -v LIP=$localIP '
   {if ( $1 != LIP )
       print $0;
    else
       print LIP" " IP
    }' > nat.conf.TMP
sudo mv nat.conf.TMP /opt/nice/enginframe/conf/plugins/interactive/nat.conf

exit

# setup slurm ip in case image has been moved so hostname is different

127.0.0.1   localhost localhost.localdomain localhost4 localhost4.localdomain4
::1         localhost localhost.localdomain localhost6 localhost6.localdomain6
172.31.23.201 node1
172.31.23.202 node2
172.31.23.203 node3
172.31.23.204 node4
172.31.23.205 node5
Enabling EF Portal Views Desktop Services
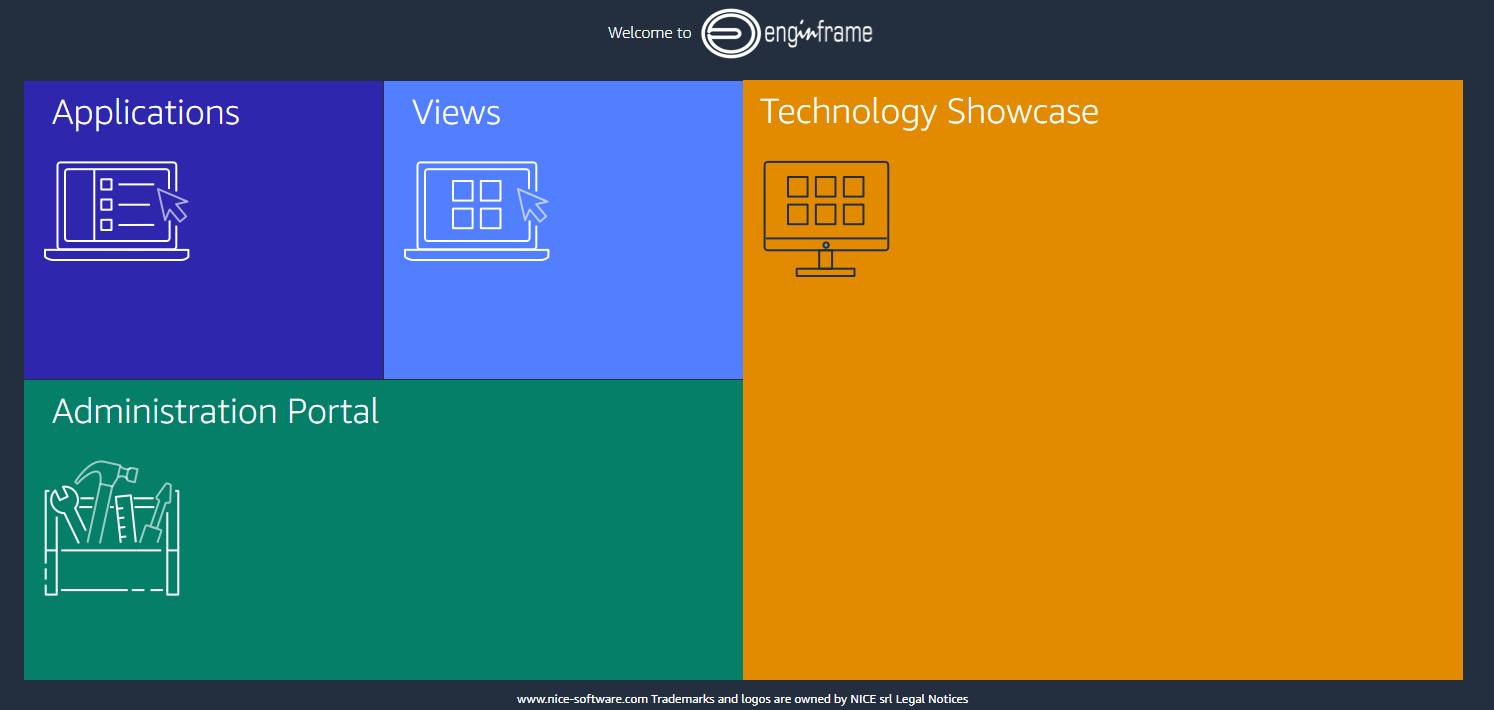
After a new installation of EF Portal you might want to enable the Linux or Windows Desktop service. Here are the steps – first login to the “Virtual Desktop/Views” portal as EF Admin user:
Then click on “Admin’s Portal” to the upper right:

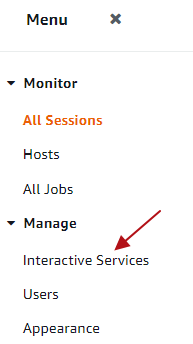
and then click on “Interactive Services” in the left menu:
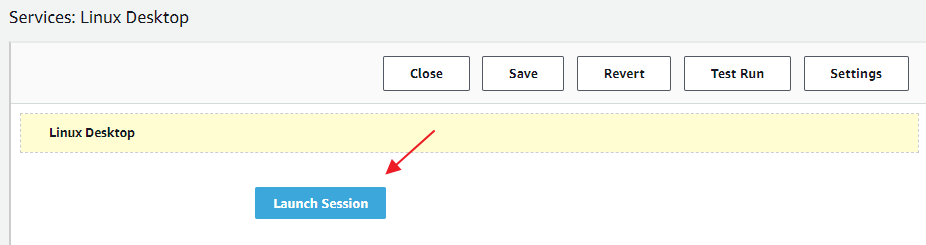
Click on the blue link of service you want to enable – e.g. “Linux Desktop” and then in the Service Editor on the “Launch Session” Button:
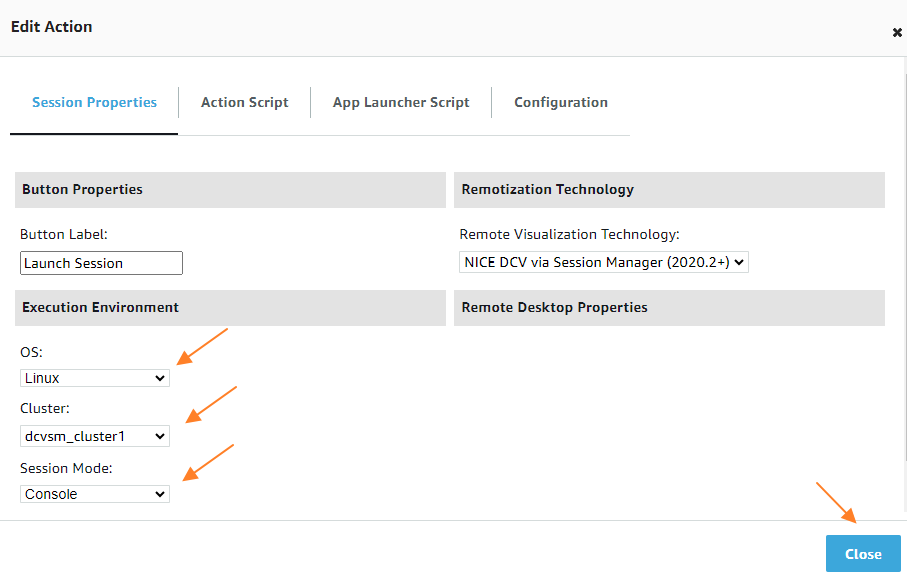
In the configuration you can configure and verify your OS, the Cluster to use and the Session Mode. Then click “Close” to confirm the values:
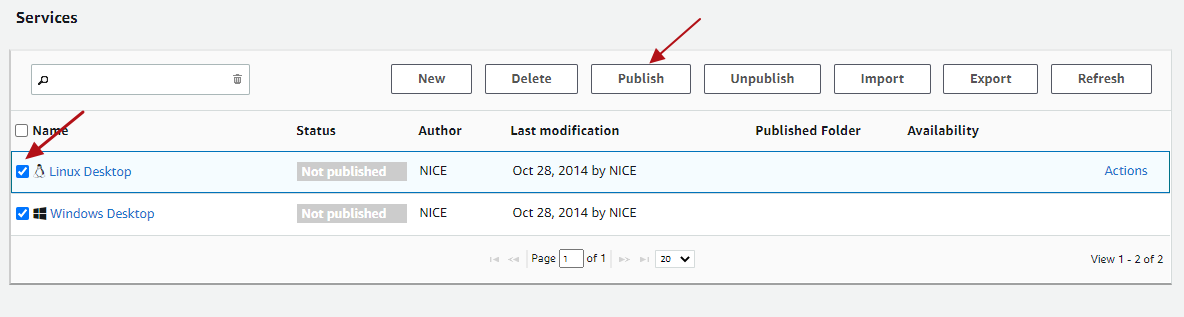
As next step you can “Save” and “Close” the service editor and you will see the services overview where you then can select and “Publish” the respective desktop services:
Switch to “User View” in the upper right and you can see the new service enabled in the left menu.
Configuring NICE DCV to use External Authentication of the DCV Session Manager Broker
With EF Portal Views Single-Sign-On (SSO) you can login to the DCV session automatically. EF Views will create a session token which is then verified by DCV using the Auth Token Verifier of NICE DCV Session Manager (SM) Broker.
In case of NICE DCV on Windows the configuration is in the registry. You can copy the broker self-signed CA to C:\Program Files\NICE\DCVSessionManagerAgent\conf\dcvsmbroker_ca.pem. For the auth-token-verifier please specify the URL for the token verifier on the Broker replacing the hostname in the example below:
REM Settings example

REM HKEY_USERS\S-1-5-18\Software\GSettings\com\nicesoftware\dcv\security\auth-token-verifier = https://ip-172-31-4-230:8445/agent/validate-authentication-token

REM HKEY_USERS\S-1-5-18\Software\GSettings\com\nicesoftware\dcv\security\ca-file = C:\Program Files\NICE\DCVSessionManagerAgent\conf\dcvsmbroker_ca.pem

REM HKEY_USERS\S-1-5-18\Software\GSettings\com\nicesoftware\dcv\security\no-tls-strict = 1
REM Powershell:
New-ItemProperty -Path "Microsoft.PowerShell.Core\Registry::\HKEY_USERS\S-1-5-18\Software\GSettings\com\nicesoftware\dcv\security" -Name auth-token-verifier -PropertyType STRING -Value "https://ip-172-31-4-230:8445/agent/validate-authentication-token" -Force

New-ItemProperty -Path "Microsoft.PowerShell.Core\Registry::\HKEY_USERS\S-1-5-18\Software\GSettings\com\nicesoftware\dcv\security" -Name ca-file -PropertyType STRING -Value "C:\Program Files\NICE\DCVSessionManagerAgent\conf\dcvsmbroker_ca.pem" -Force

New-ItemProperty -Path "Microsoft.PowerShell.Core\Registry::\HKEY_USERS\S-1-5-18\Software\GSettings\com\nicesoftware\dcv\security" -Name no-tls-strict -PropertyType DWORD -Value 1 -Force
In case of NICE DCV on Linux you can configure external authentication in /etc/dcv/dcv.conf (for ca-file, please specify the path to the broker’s self-signed CA copied to the host previously. For auth-token-verifier, specify the URL for the token verifier on the Broker replacing the hostname example below):
[security]
administrators=["dcvsmagent"]
ca-file="/etc/dcv-session-manager-agent/dcvsmbroker_ca.pem"
no-tls-strict=true
auth-token-verifier="https://ip-172-31-4-230:8445/agent/validate-authentication-token"
After the configuration please restart the DCV server. Any questions just let us know. Read more about NICE DCV.


